Coordinator: building a roster
As a coordinator, your job is to turn the solver’s draft into a roster your ecclesia is happy to publish. This guide walks the flow from queuing a new run through to hitting Publish. Reading time: seven minutes.
Everything below assumes you already have activity templates in place. If not, an administrator sets those up first — see Add a recurring Friday youth event for a worked example.
Queue a new roster run
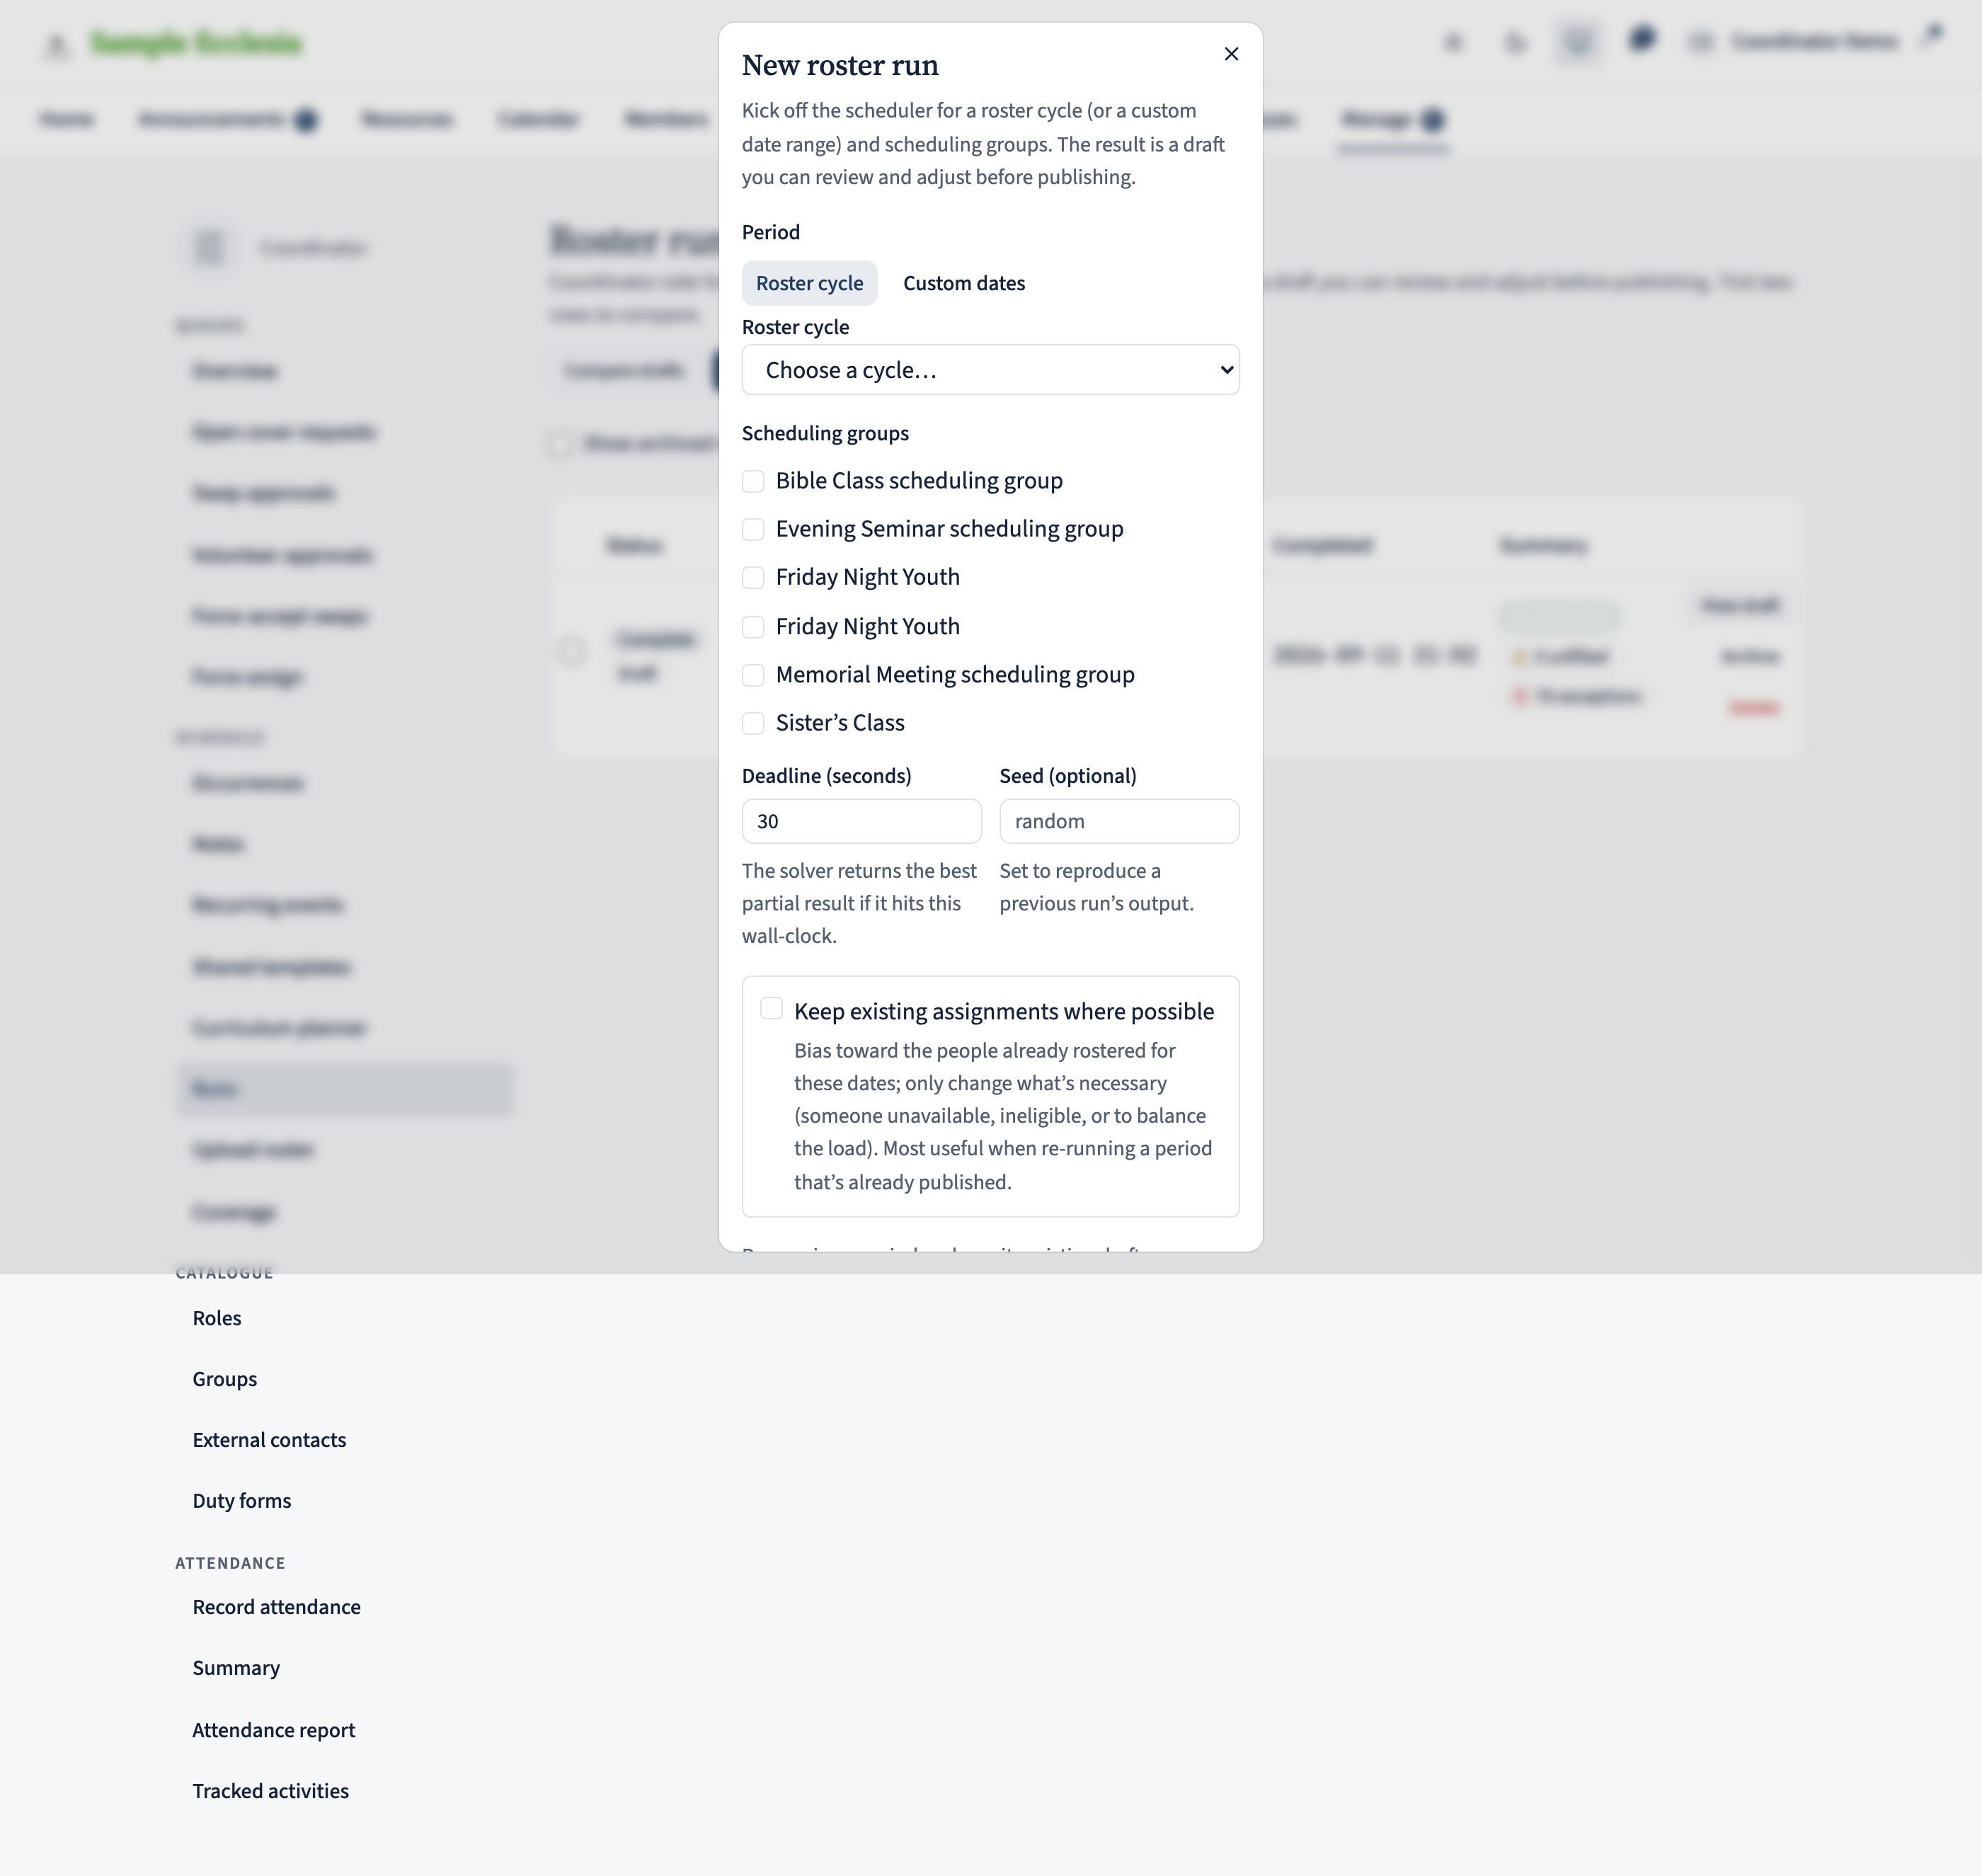
Open Manage → Runs from the navigation and click New run. Choose the period, then the groups:
- Roster cycle — pick one of your ecclesia’s roster cycles (say “Aug–Oct 2026”) and the solver covers exactly that period, dates and all. Don’t use cycles? Switch to Custom dates and set an explicit from/to range — a quarter is common for weekly meetings, and longer windows take longer to solve.
- Scheduling groups — which parts of the program to include. Tick the youth activities if that’s what you’re rostering; leave the memorial + Bible class alone if a different coordinator handles those.
- Deadline (seconds) — how long the solver gets to work. 30 seconds is enough for most tenants; bump it up to 120 if you routinely run large windows.
Click Start run. The solver runs asynchronously in the background; you’ll get a chip on the Runs page telling you when the draft is ready. Re-running the same period replaces its existing draft, so you never end up with a pile of half-finished drafts for the same dates. Grab a coffee.
Open the draft
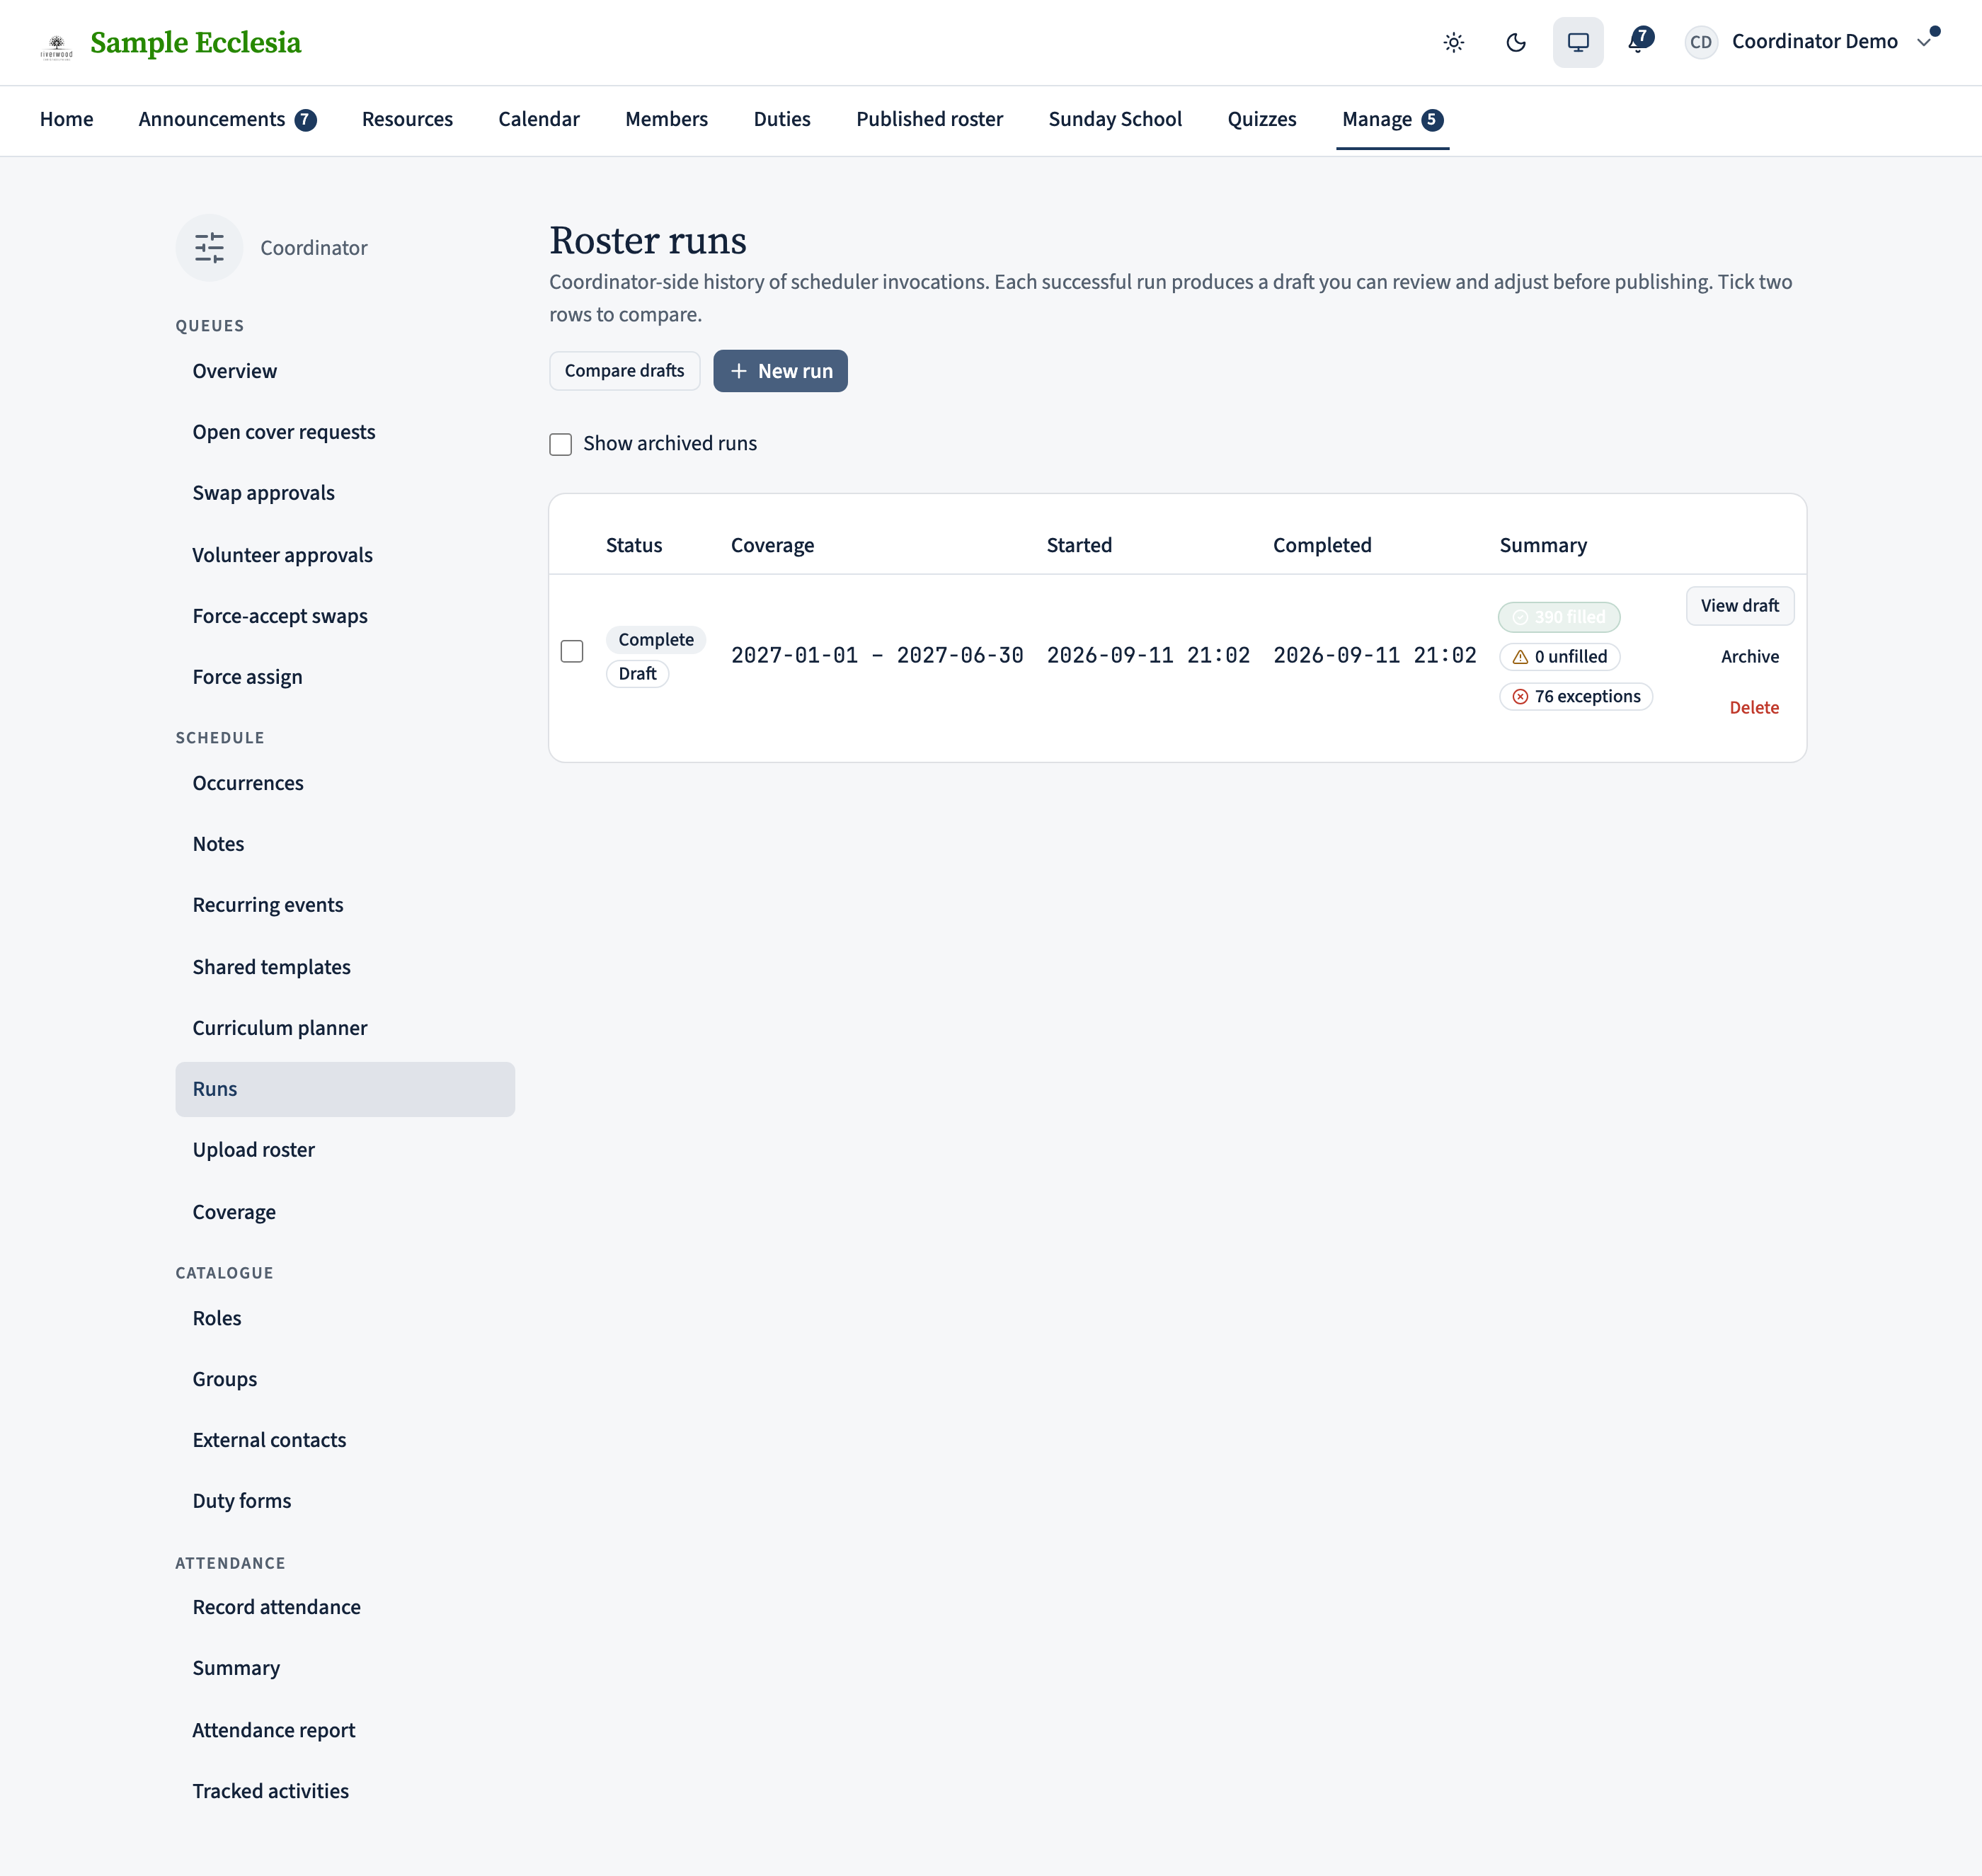
Back on Runs, each row shows the run’s status. Once it flips to Complete, click View draft to open the review page — the three-pane layout below is where you spend most of your time.
If two runs happen to be worth comparing (e.g. before and after a policy tweak), tick the checkbox on both rows and click Compare drafts to see them side-by-side. Rows highlight where the two runs disagreed.
Read the three-pane review
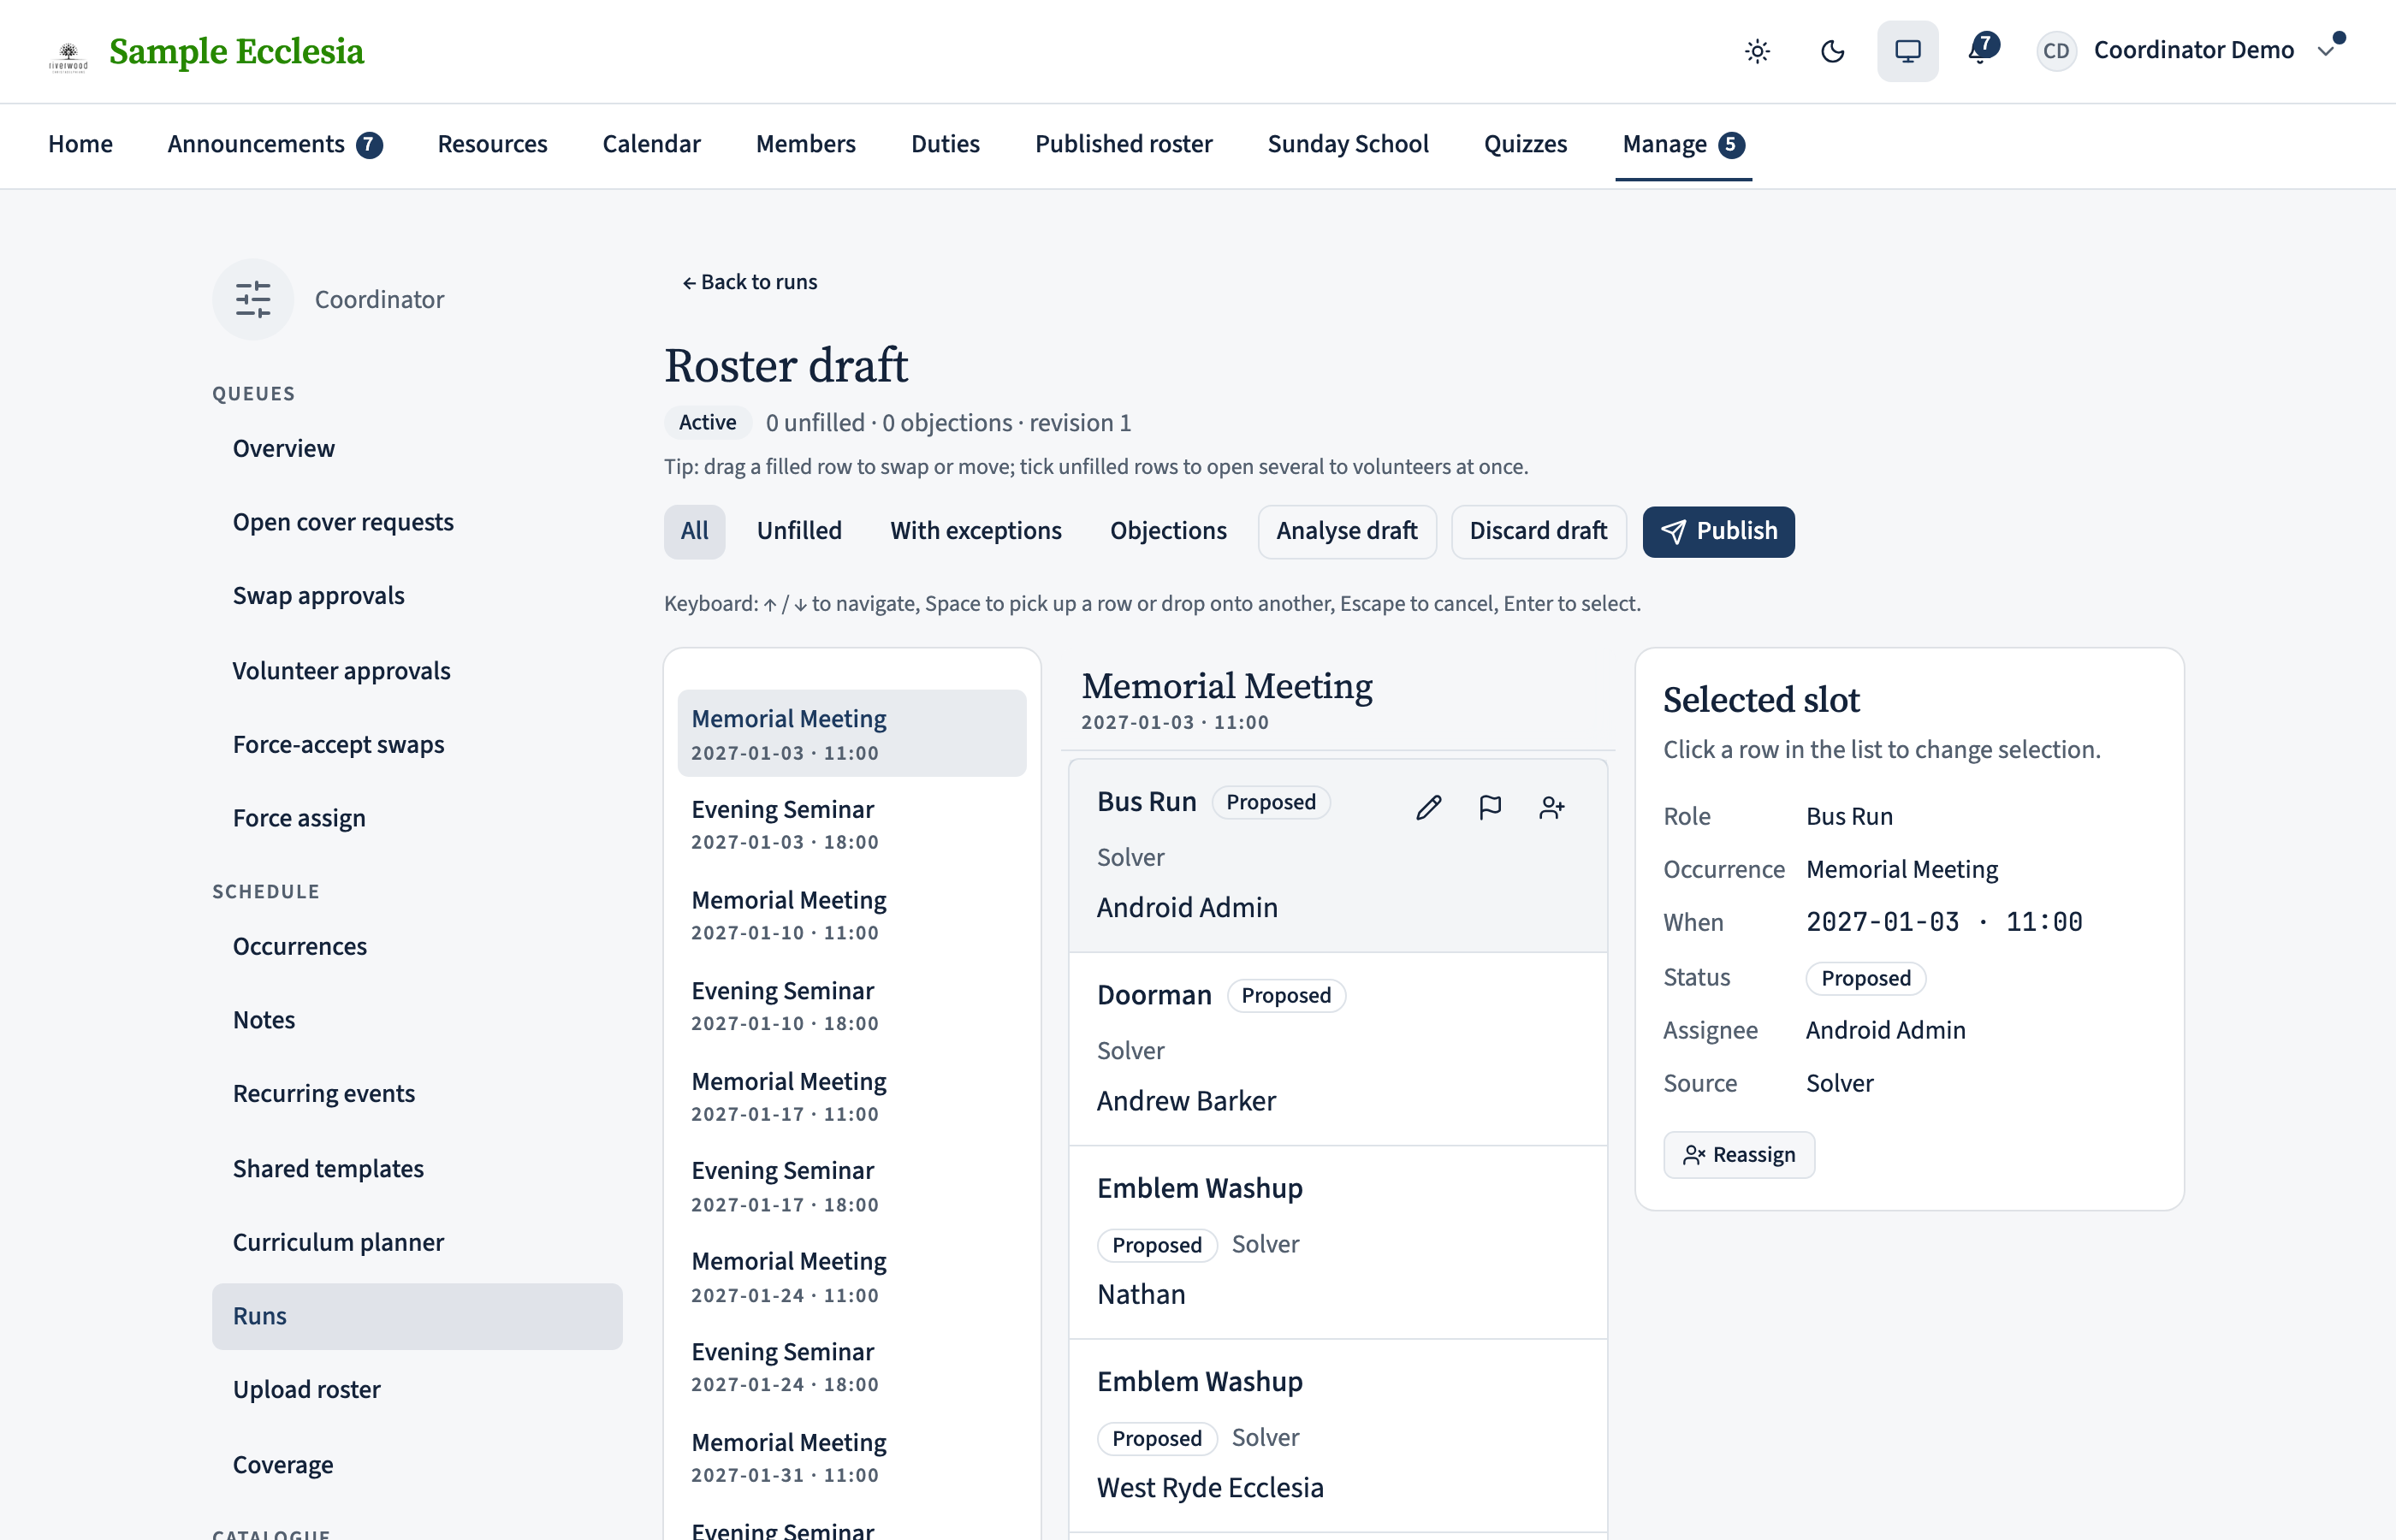
The draft page splits into three panes:
- Left rail — every occurrence in the window, sorted by date and time. Click one to jump the middle pane to its section. The rail highlights whichever occurrence contains the row you’re looking at so you never lose your place.
- Middle pane — a flat list of every assignment slot in the draft, grouped under sticky occurrence headers. This is deliberate: a flat list lets you scan for gaps across the whole window rather than clicking through 12 tabs.
- Right pane — details for whichever row you’ve selected in the middle pane. When the solver couldn’t fill a slot, the diagnostics here explain why (unavailable, ineligible, over their cap, and so on).
NOT FILLED renders as bare red text rather than a badge — the word is the signal. Scan for the red rows; those are the ones that need your attention.
Reassign or swap an assignment
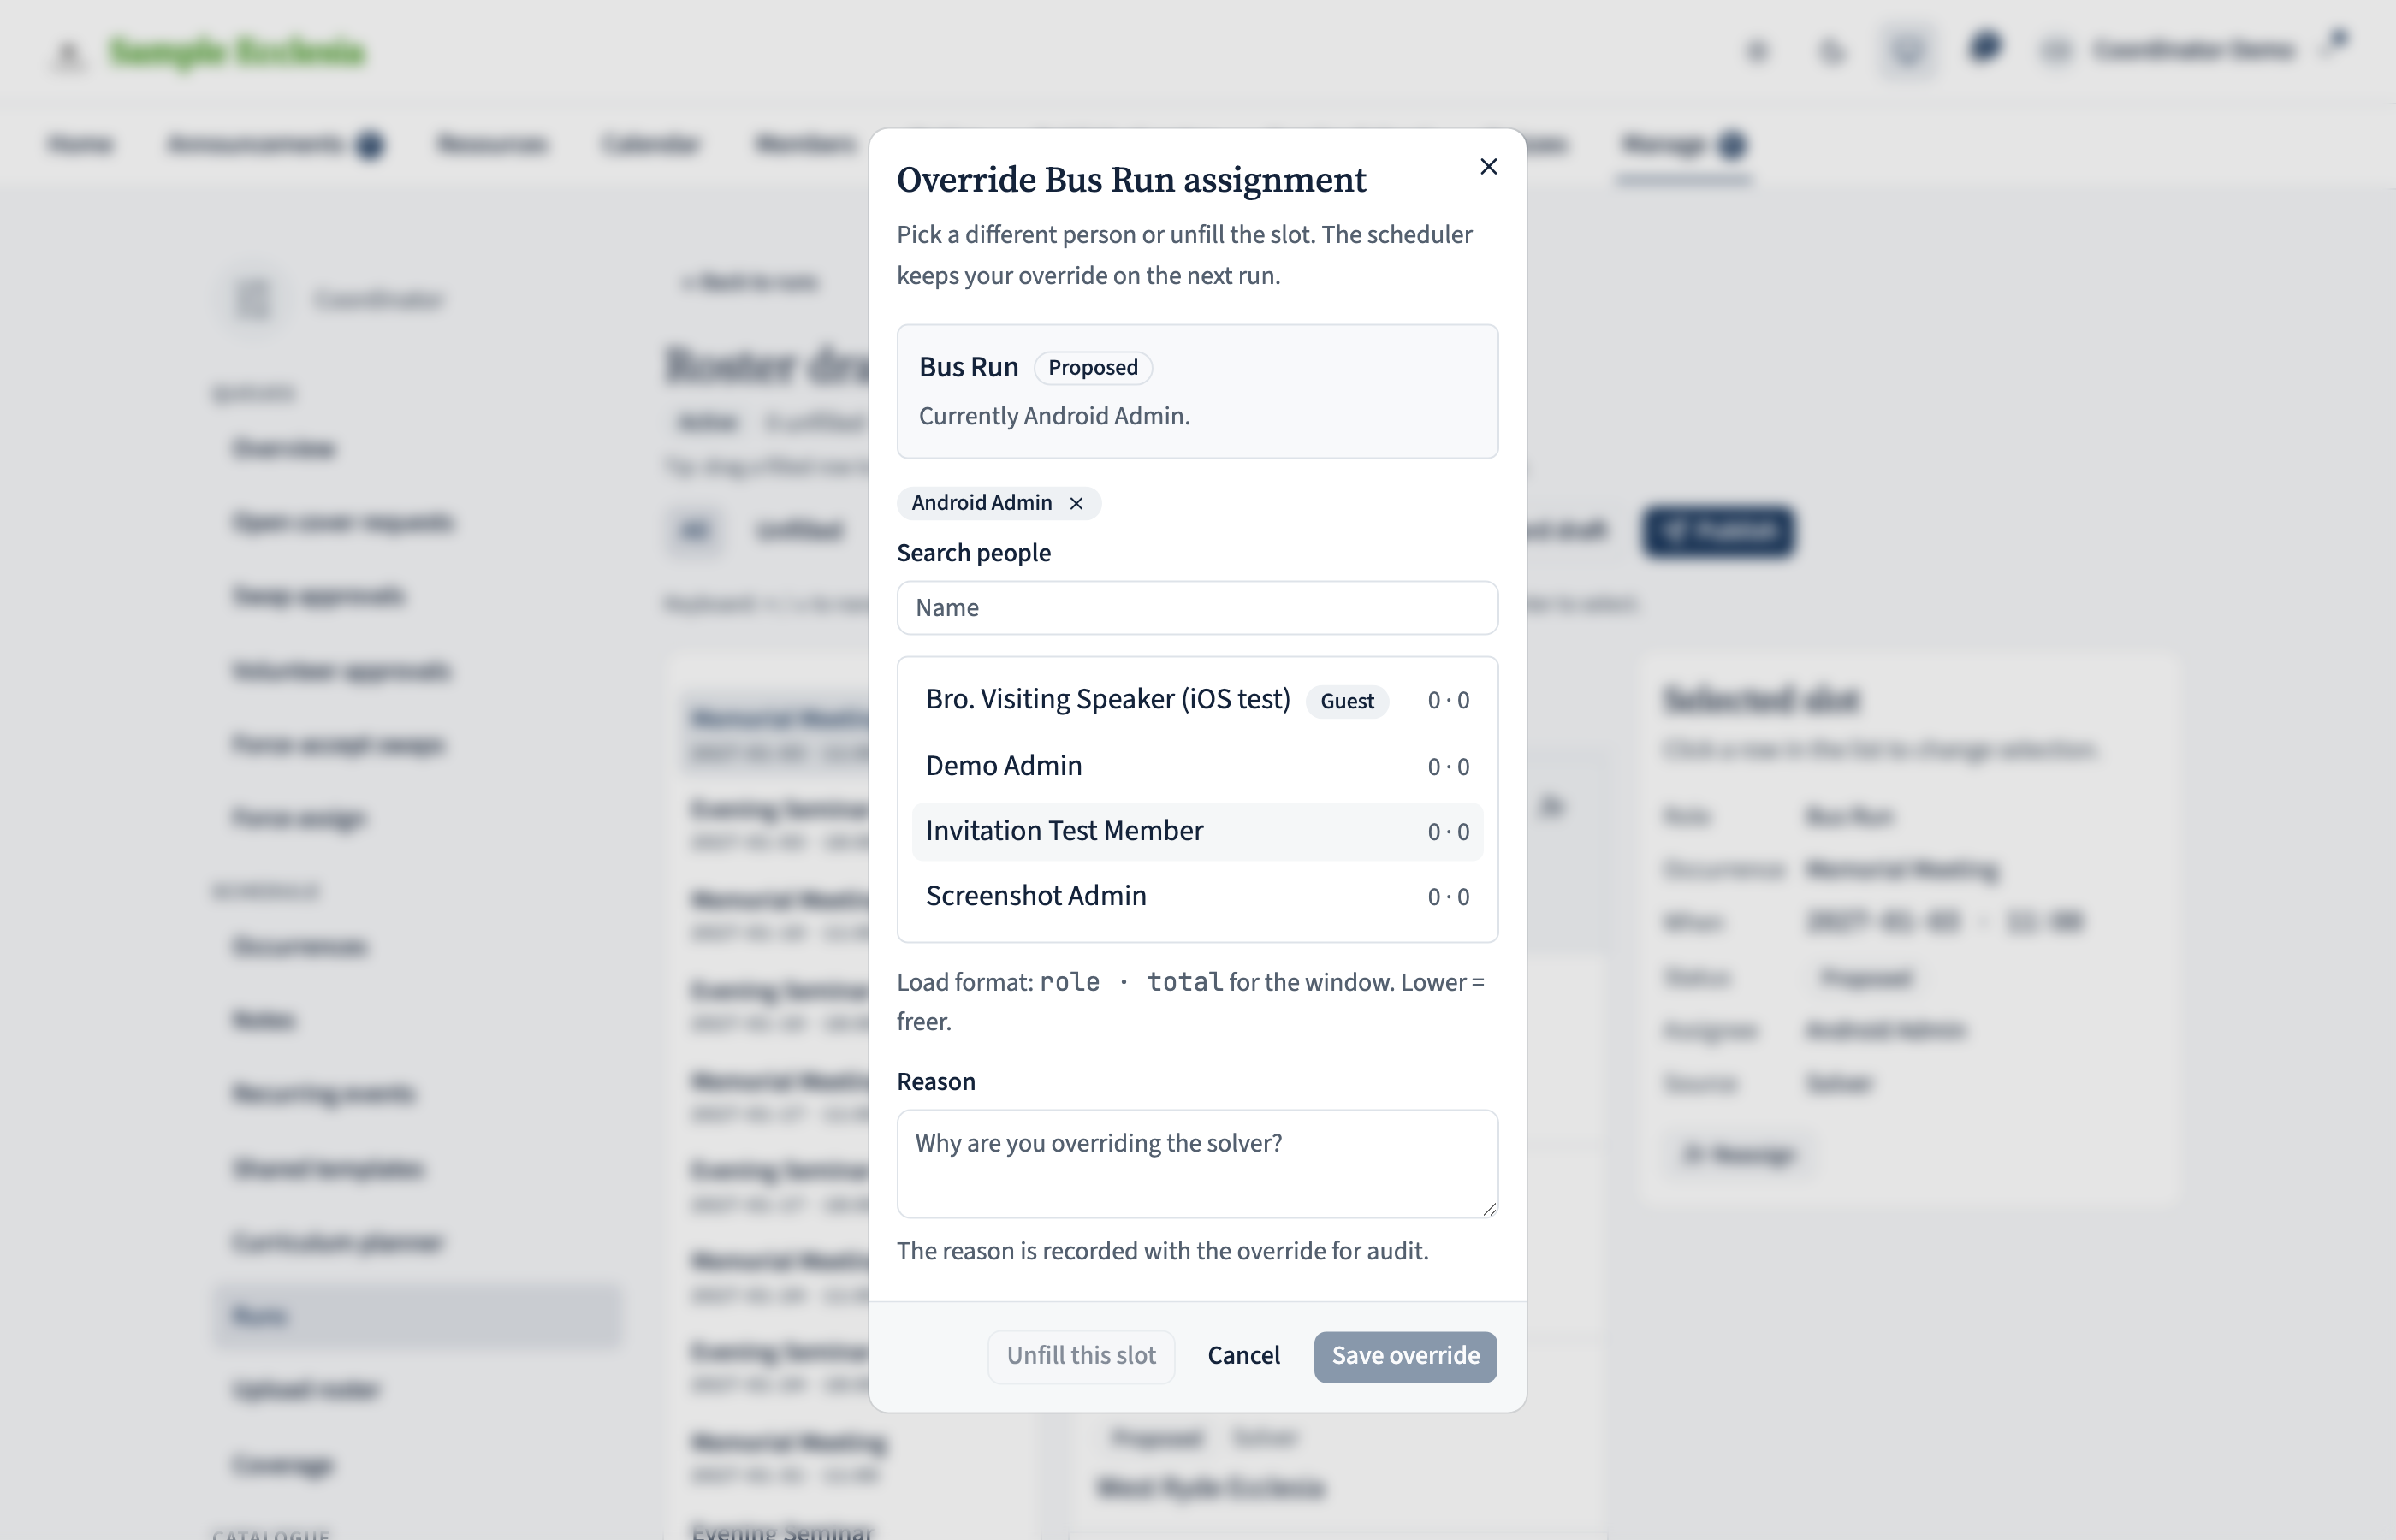
There are two ways to change who’s on a slot. For full control, open the reassignment dialog (shown here) — click the pencil icon on the row, or Reassign in the right pane. It lets you pick from a load-sorted candidate list (each person’s load shown as role · total, lower being freer), unfill the slot, and add a reason that’s recorded on the audit log.
For quick reshuffles without a dialog, drag any filled row onto another:
- Filled → empty: the person moves. The source row becomes unfilled; the target row picks them up.
- Filled → filled: the two people swap.
Every drag-and-drop reassign is recorded on the audit log with reason “Reassigned via drag-and-drop”, so it’s clear which changes came from the quick path versus the full reassignment dialog.
Open a batch of unfilled slots to volunteers
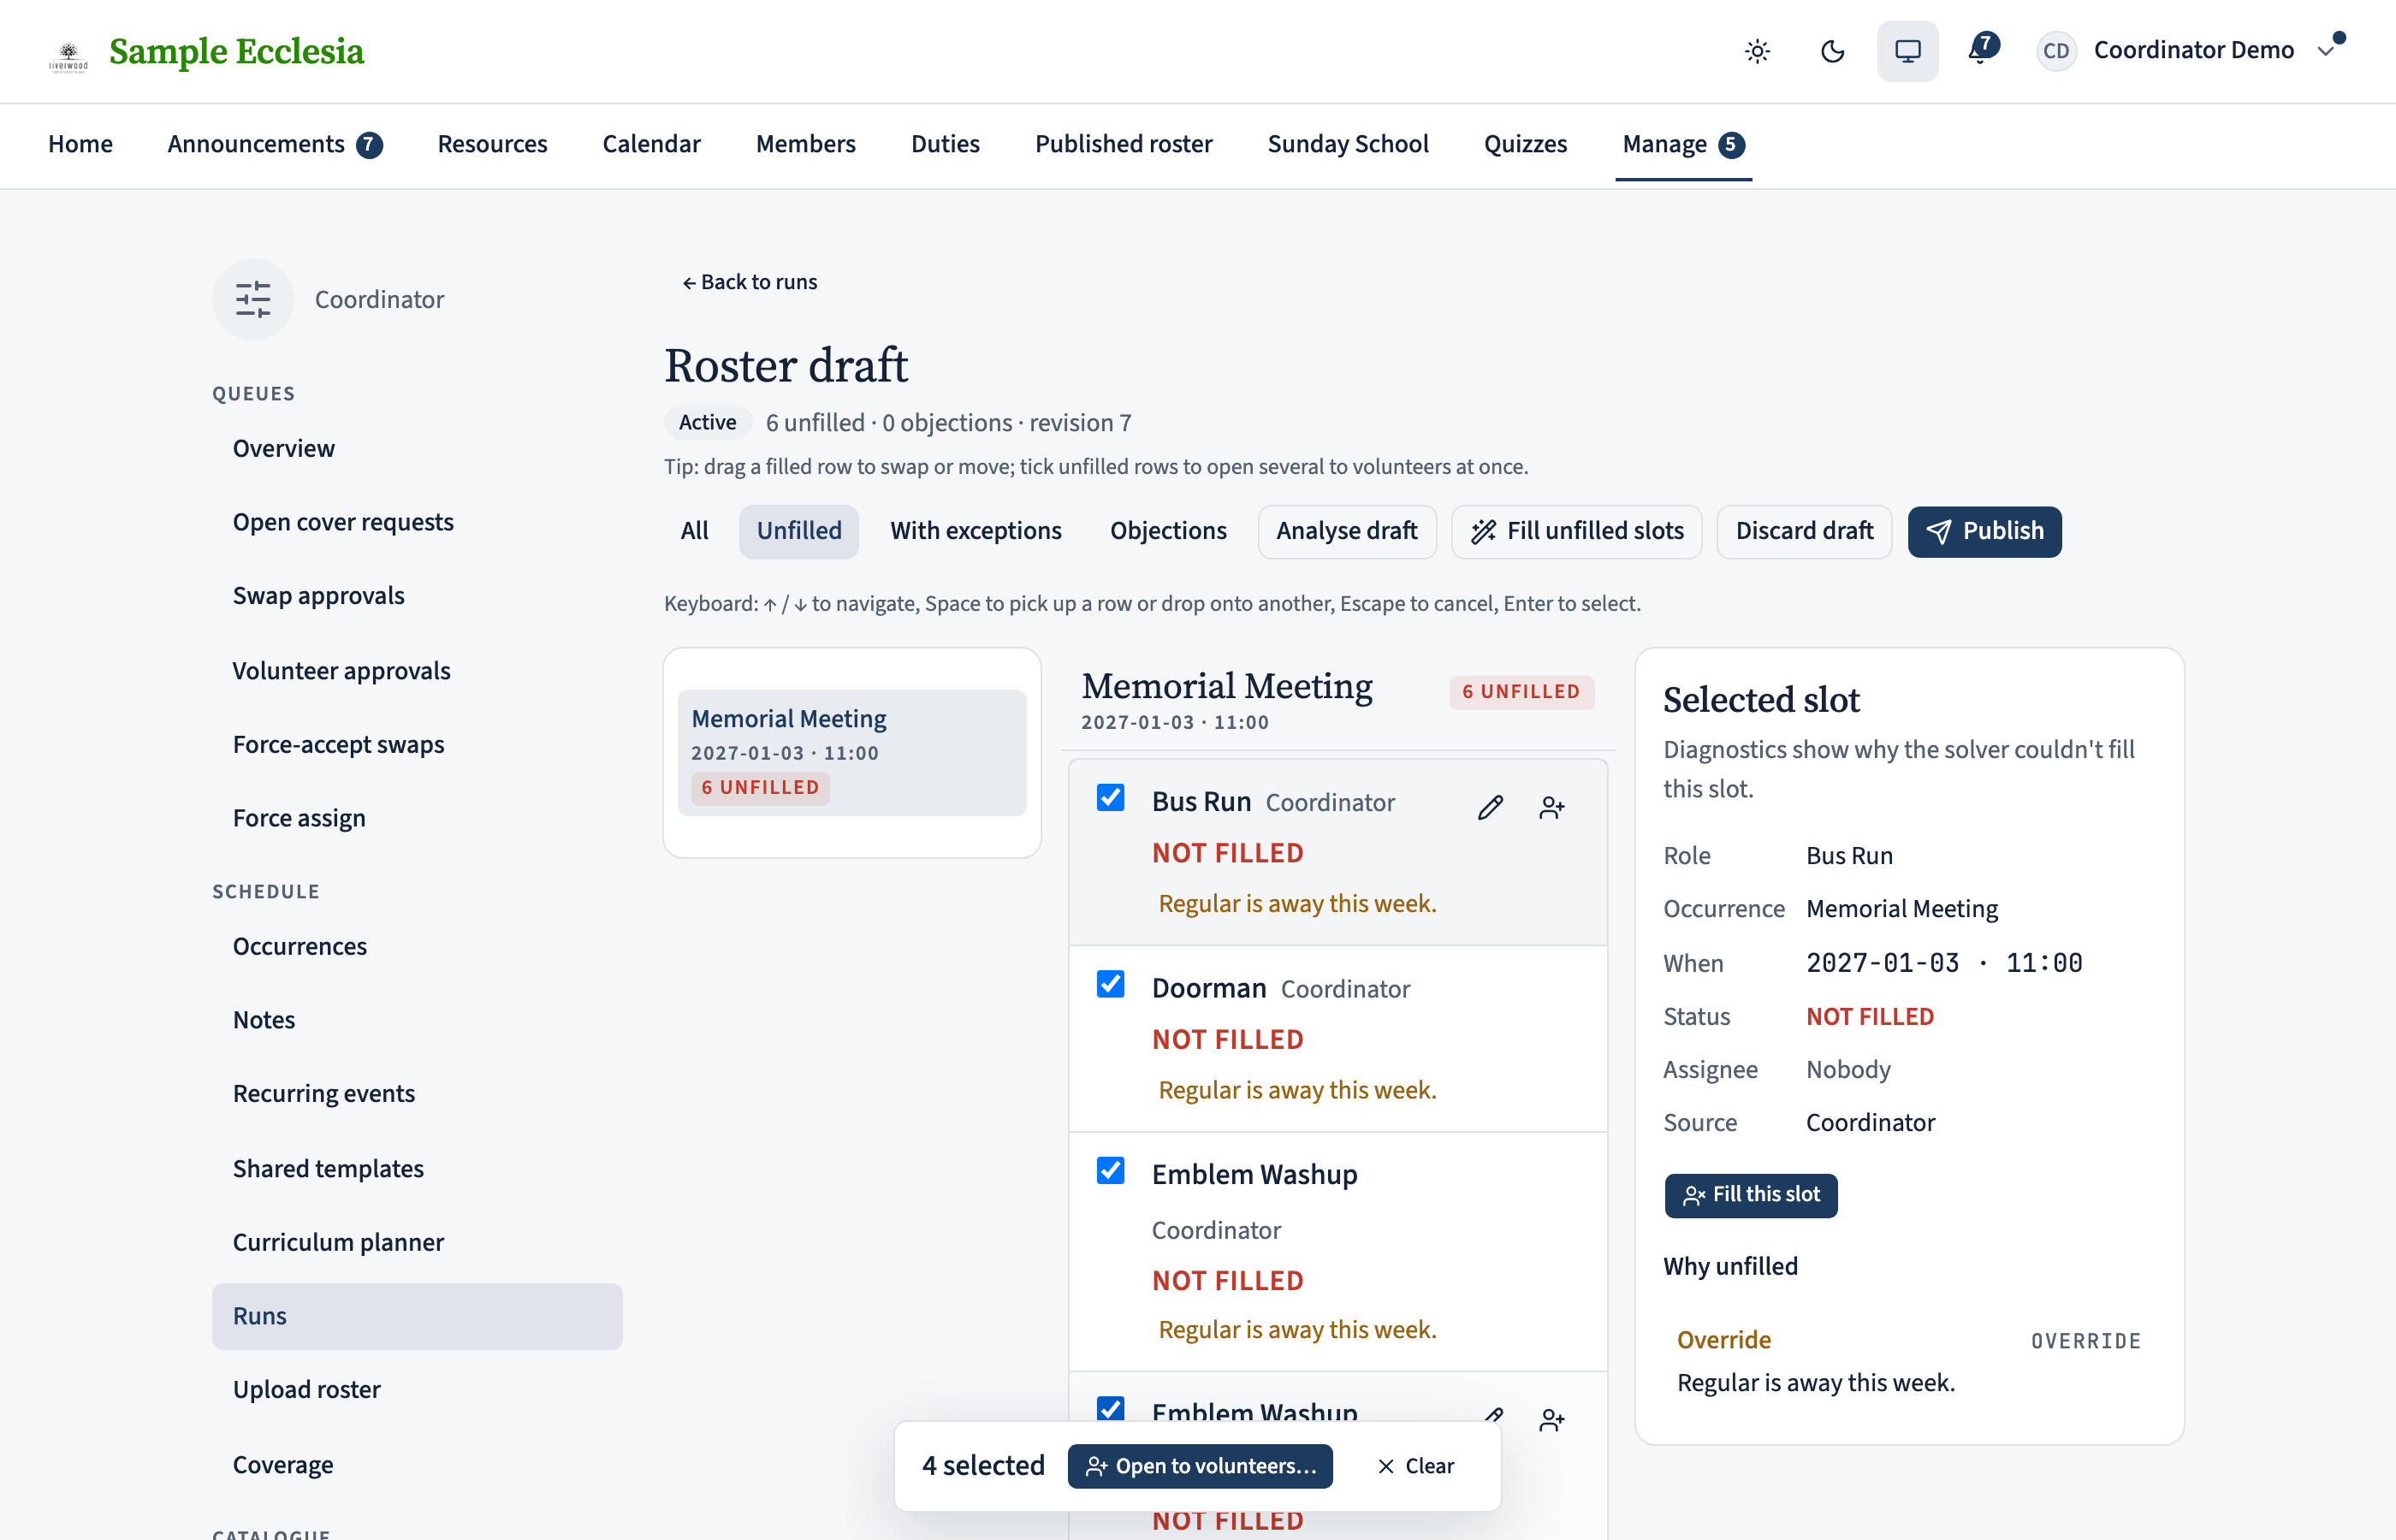
When the solver leaves a chunk of gaps — the classic Christmas-week scenario — tick the checkbox on the left of each unfilled row. A floating action bar appears at the bottom of the screen with the selection count and Open to volunteers….
Click it to attach one message across every selected slot, then confirm. The server sends the volunteer requests in parallel and toasts a summary — typically all-succeed, occasionally one or two fail (usually because someone else already claimed a slot in a race).
Understand solver diagnostics on the right pane
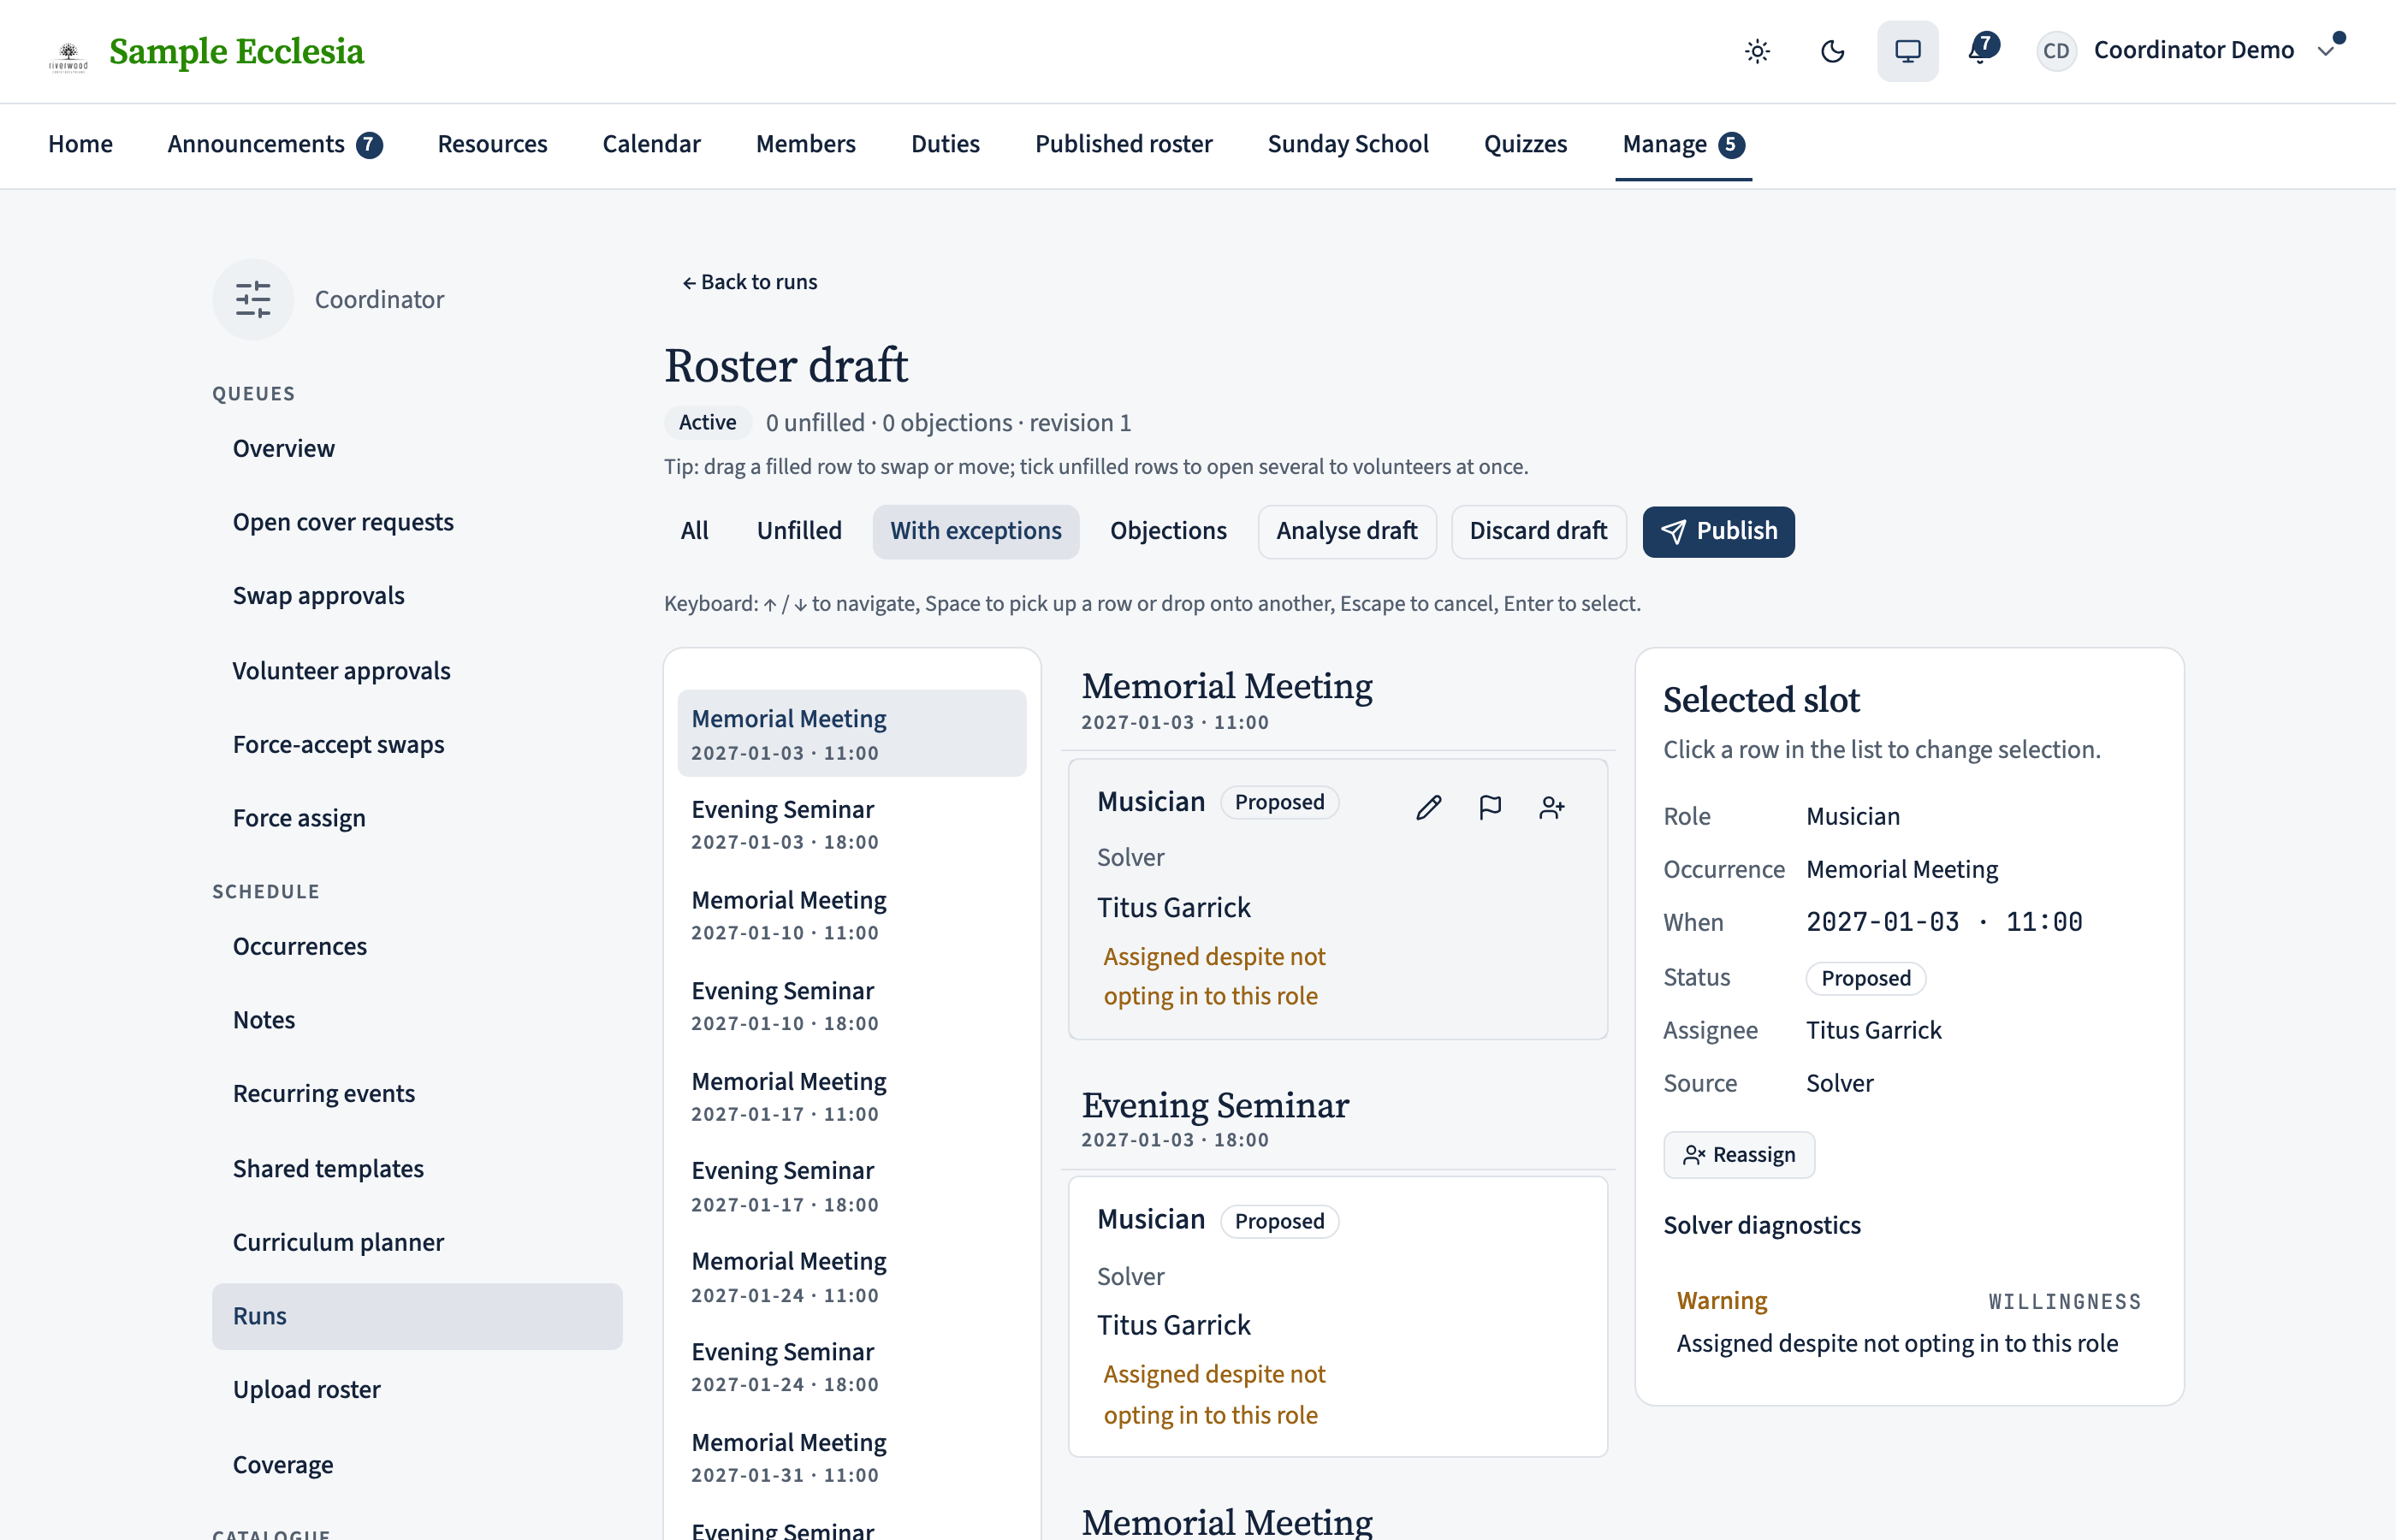
Click any row and the right pane fills with context: the role, the occurrence, the current assignee (or NOT FILLED), and the solver’s diagnostics grouped by severity:
- Blocked — a hard eligibility rule stopped the solver from picking someone (age, sex, baptism, missing qualification, unavailability).
- Override — a coordinator’s explicit reassignment on a prior run persisted here.
- Warning — a soft rule the solver bent to fill the slot (someone over their cap, or on a role they preferred not to serve).
- Info — provenance the audit trail needs (e.g. this row came from a standing assignment).
If a slot is unfilled, the pane leads with Fill this slot — a shortcut into the same picker the pencil icon opens, without hunting for the row.
Raise objections instead of hunting for the fix
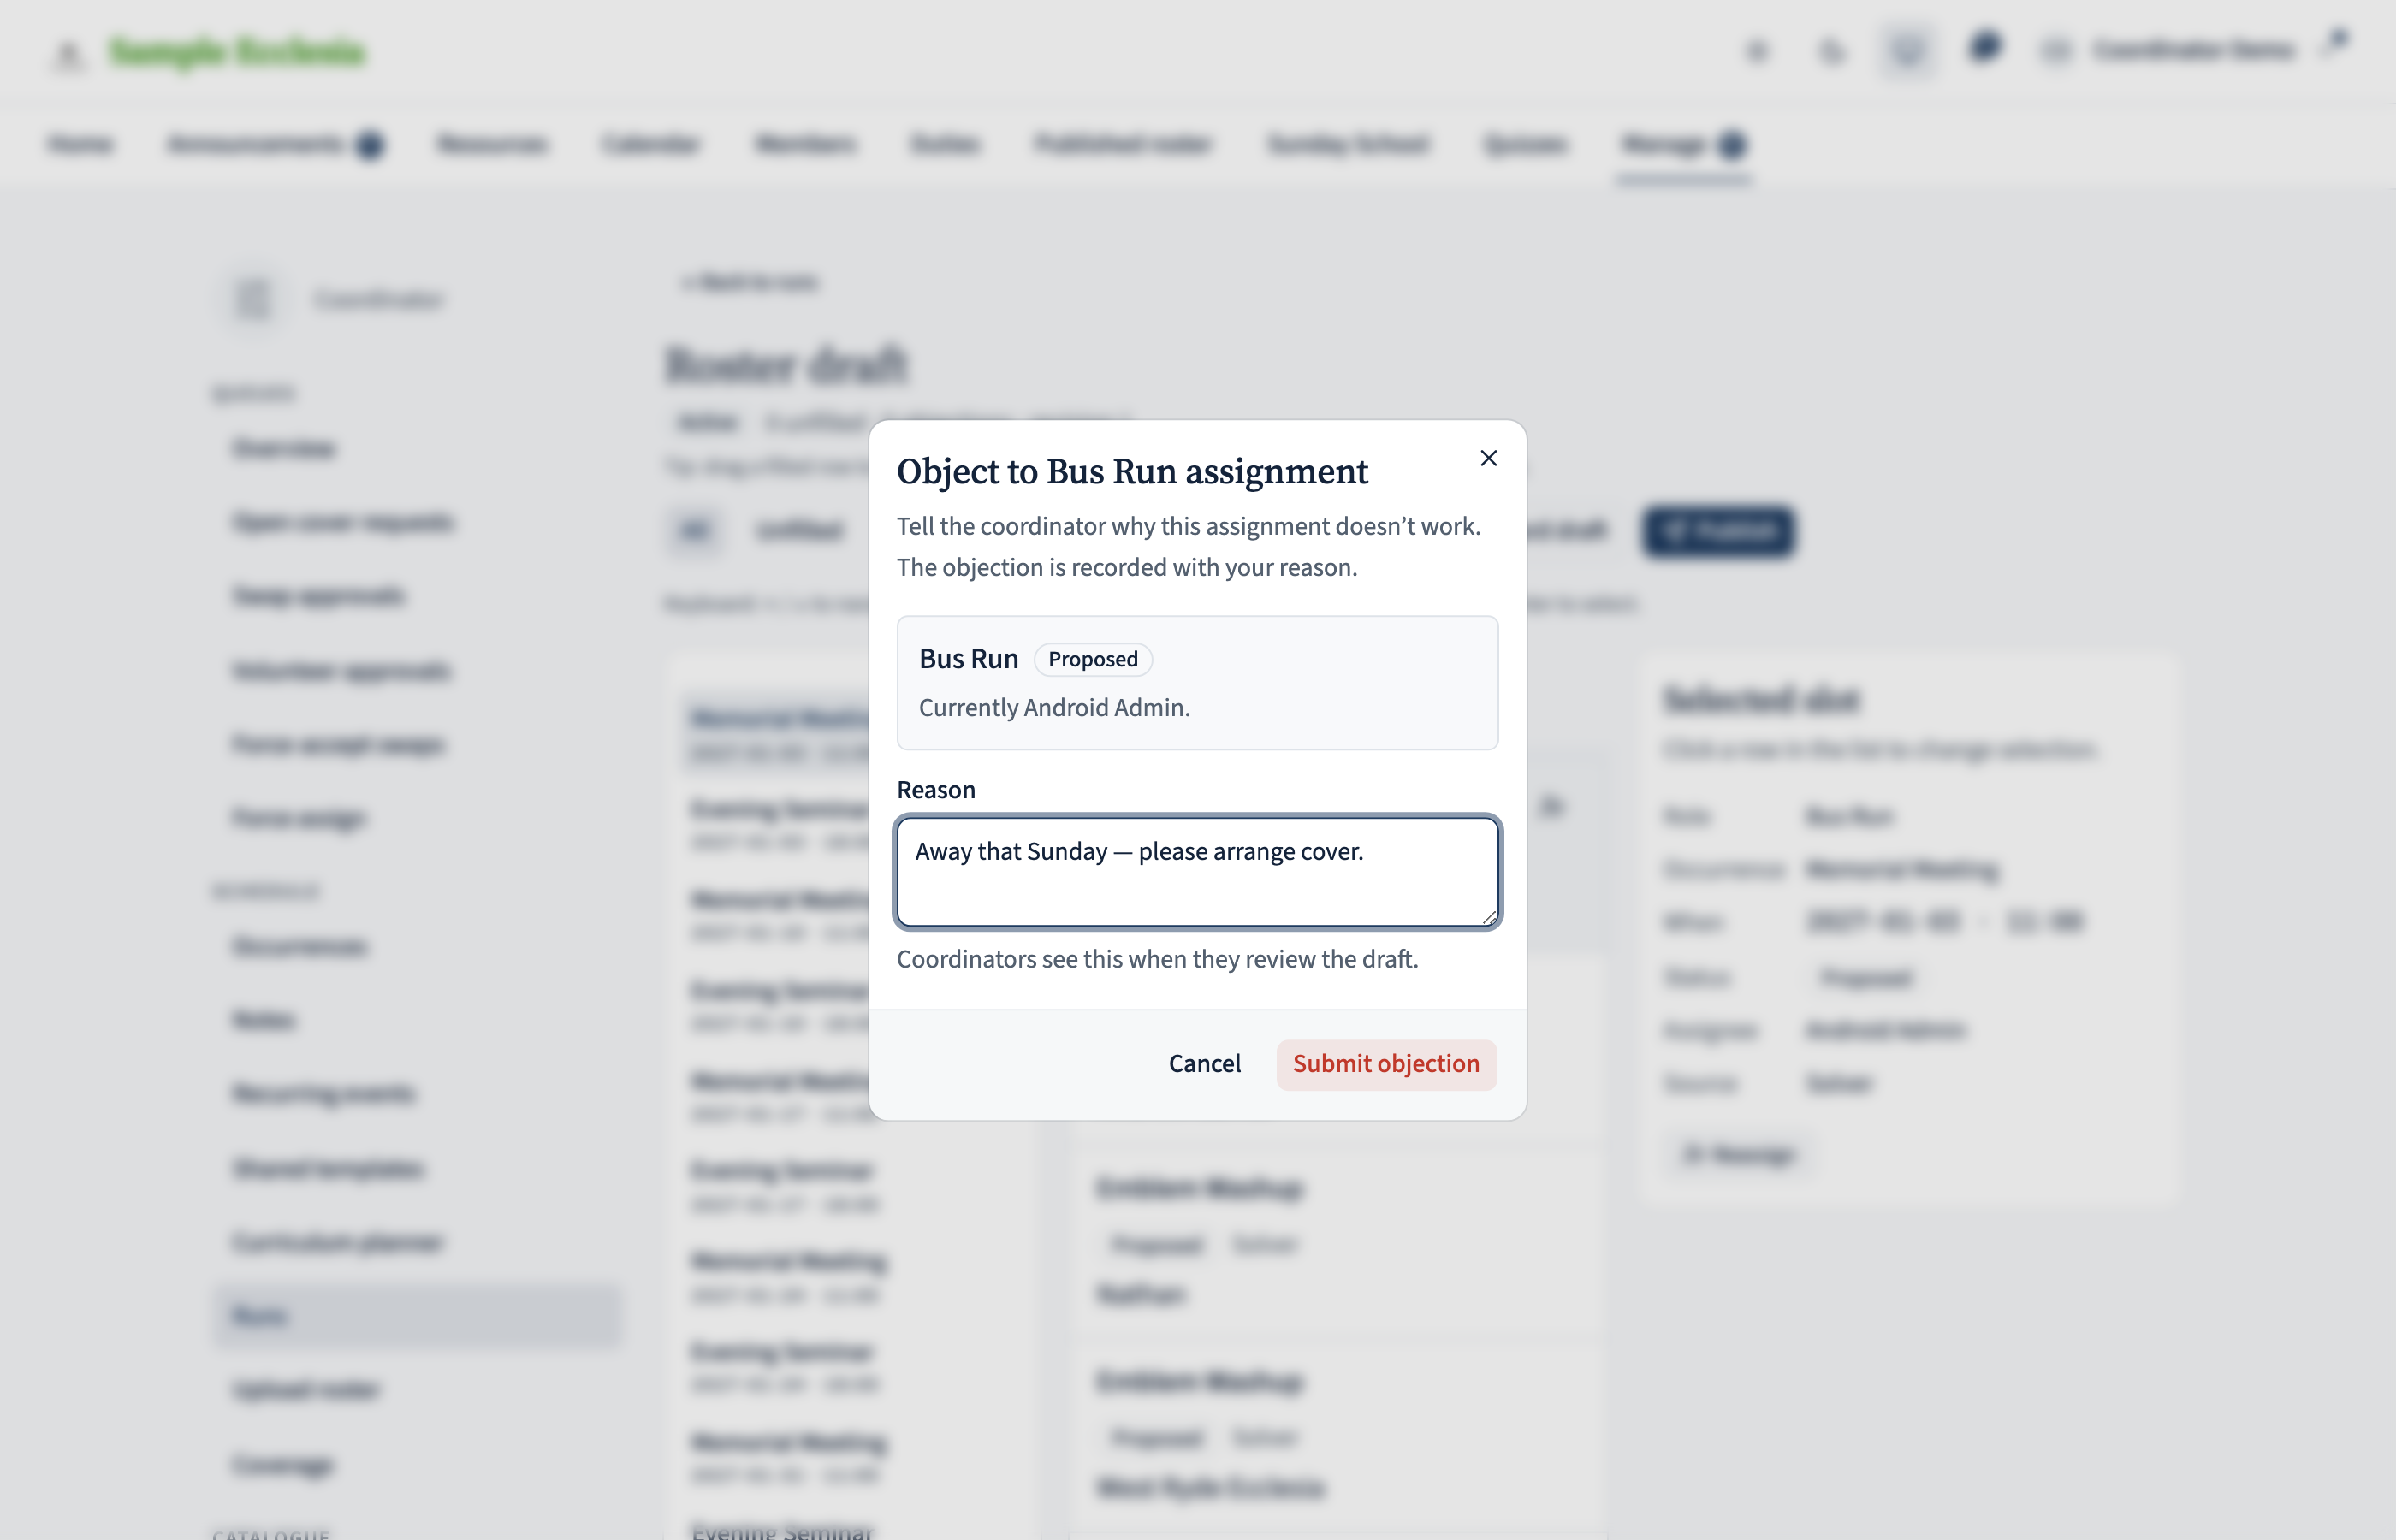
Sometimes you know a solver pick is wrong but you don’t want to reshuffle right now — you want to flag it and talk to a colleague first. Click the small flag icon on the row, add a reason, and save. The assignment gets a visible Objection badge; you (or another coordinator) can come back to it later without losing track of why.
Handle a stale draft — analyse and fix in place
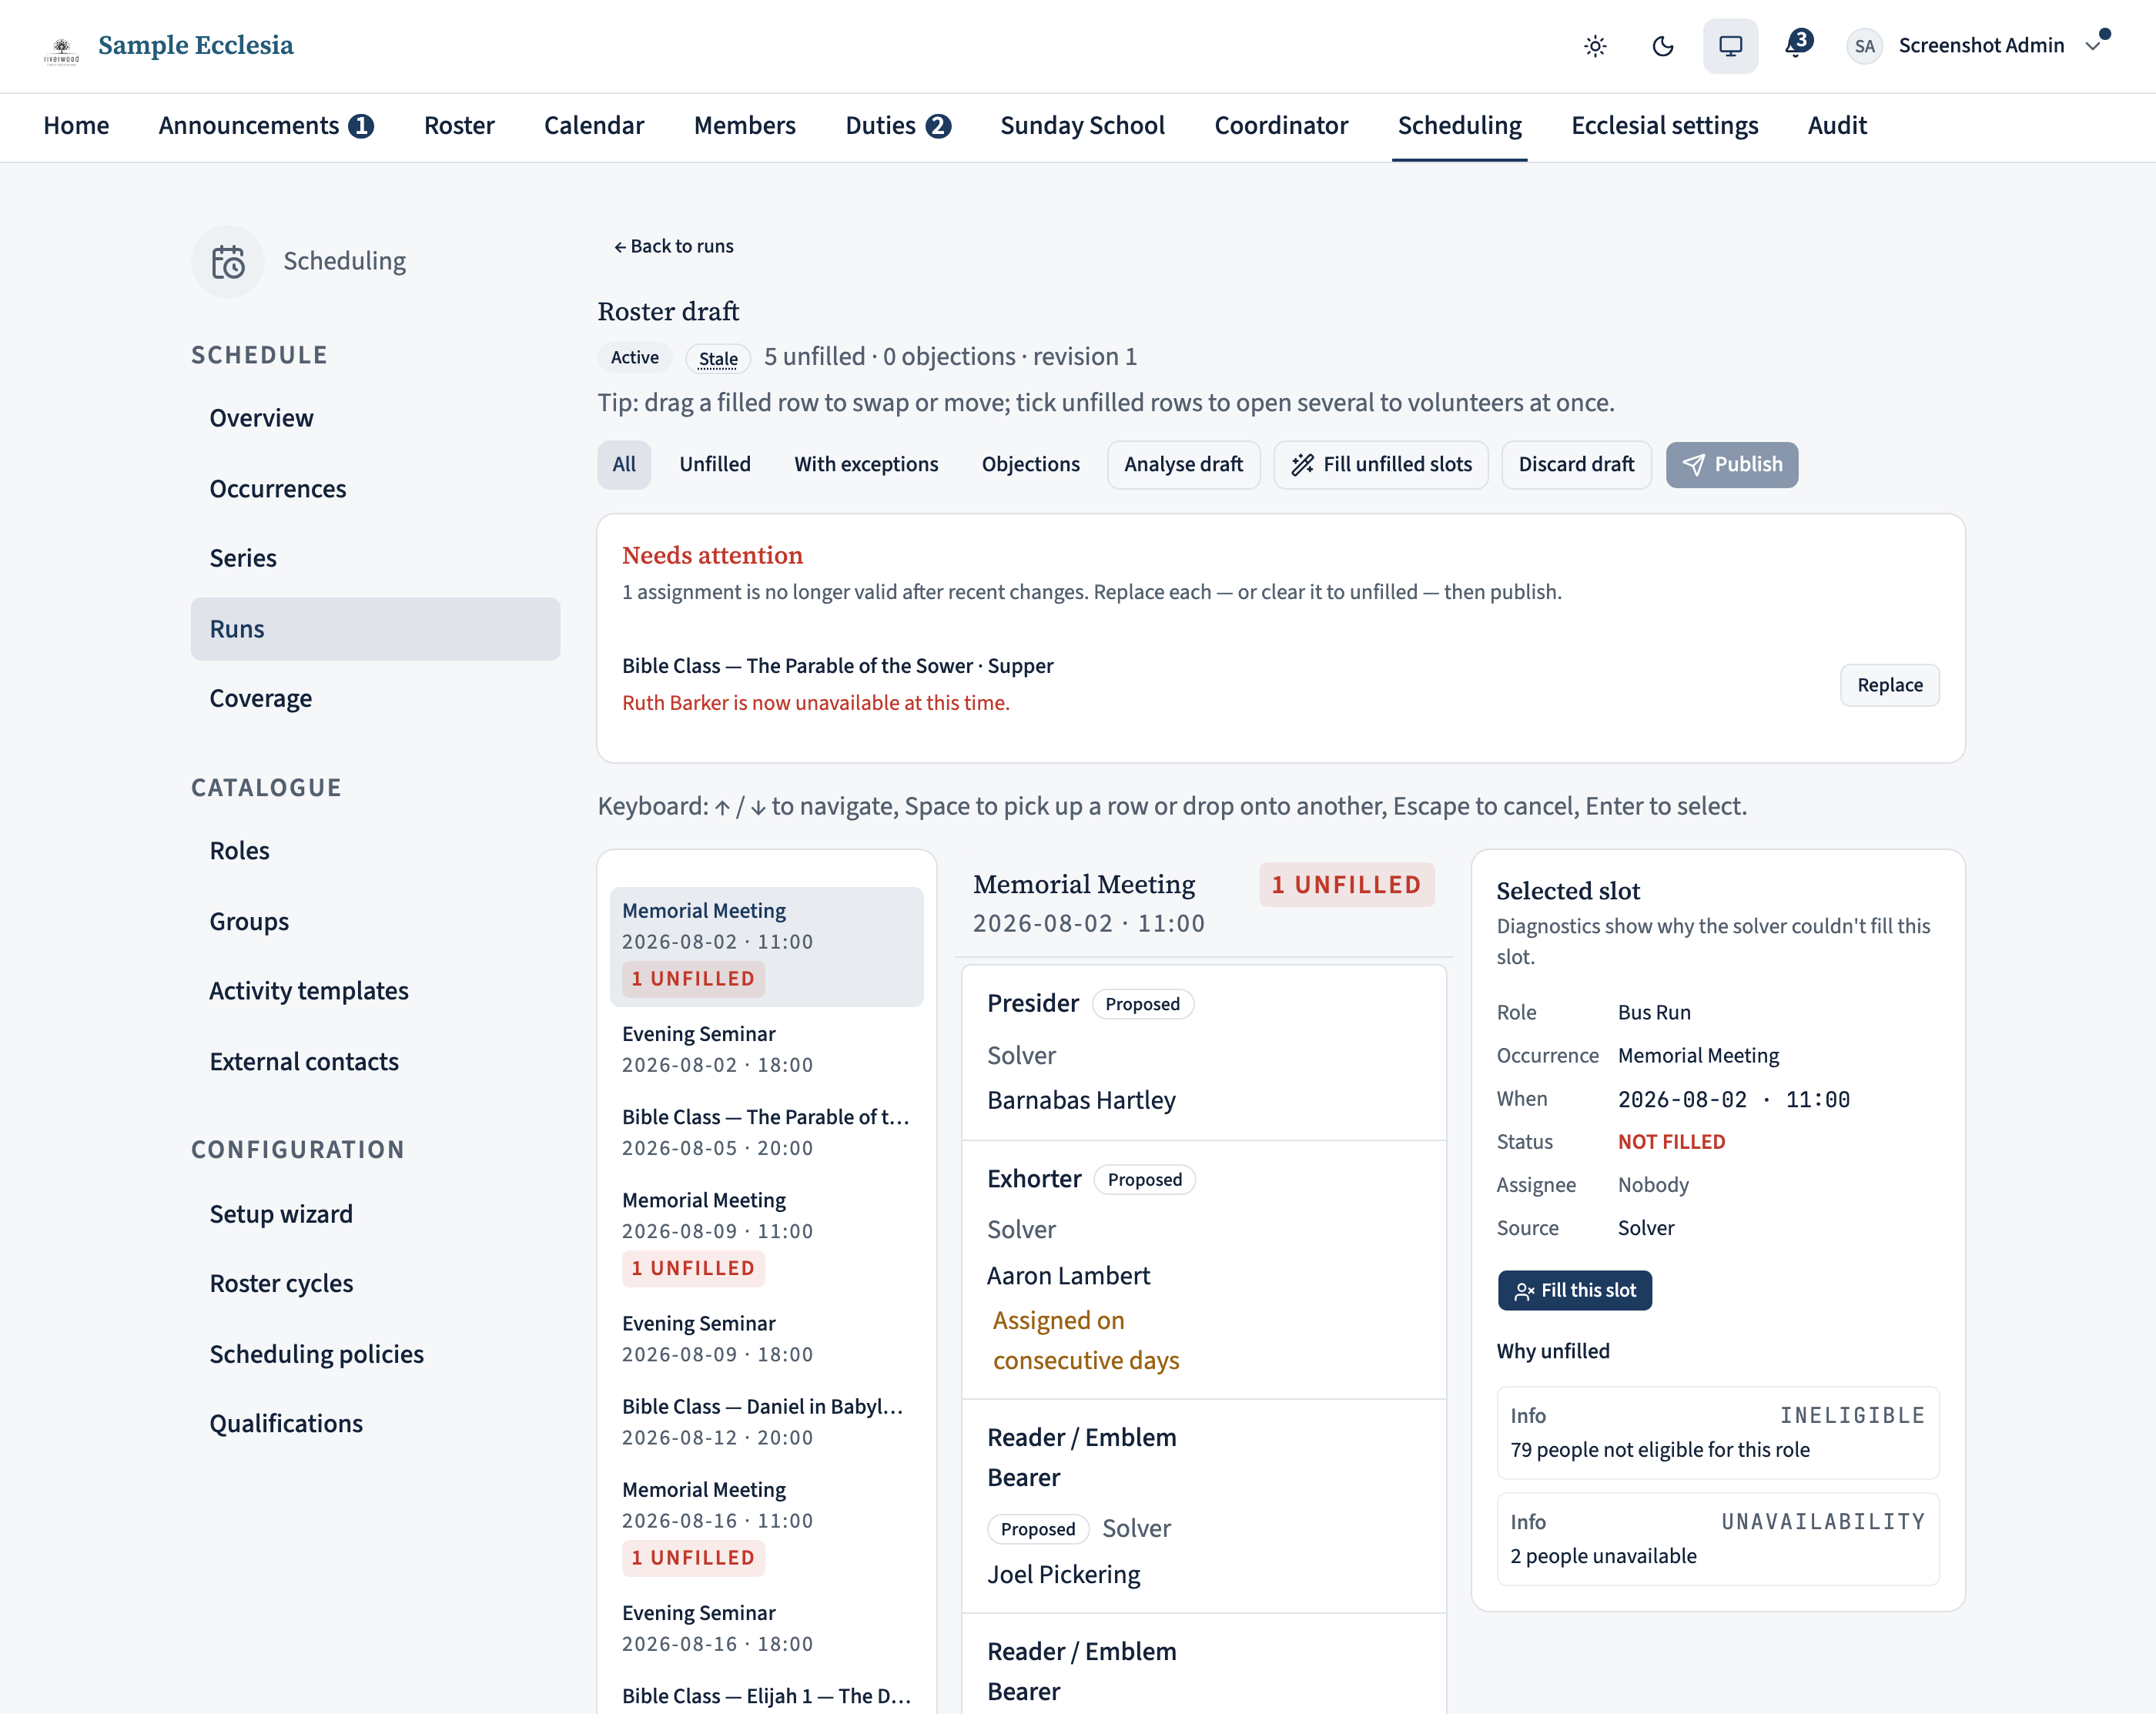
If someone’s availability, eligibility, or an occurrence changes after the run, the draft picks up a Stale badge. That badge is just a hint — often nothing is actually wrong (even a renamed member trips it). Don’t re-run the roster and throw away your reviewed draft; instead click Analyse draft in the header.
If any assignments are no longer valid, they appear in a Needs attention list at the top — each showing the occurrence and role, who was assigned, and why it’s no longer valid (“now unavailable”, “no longer eligible”, “teaching Sunday School at this time”, and so on). Click Replace on a row to fix it in place: pick a valid person from the candidate list, or clear it to unfilled and let Fill unfilled re-solve just that slot. The list re-checks itself as you go.
Occasionally an event changes so much that a slot no longer exists — the template’s roles were edited, or the occurrence was regenerated. When every flagged row is like that, there’s nothing to reassign in place, so the card switches to This draft is out of date and offers Discard draft: discard it and start a fresh run against the current schedule rather than fixing seats one by one.
Once nothing remains flagged, Publish re-enables. Benign changes never block publishing — only real breakages do.
Publish the draft
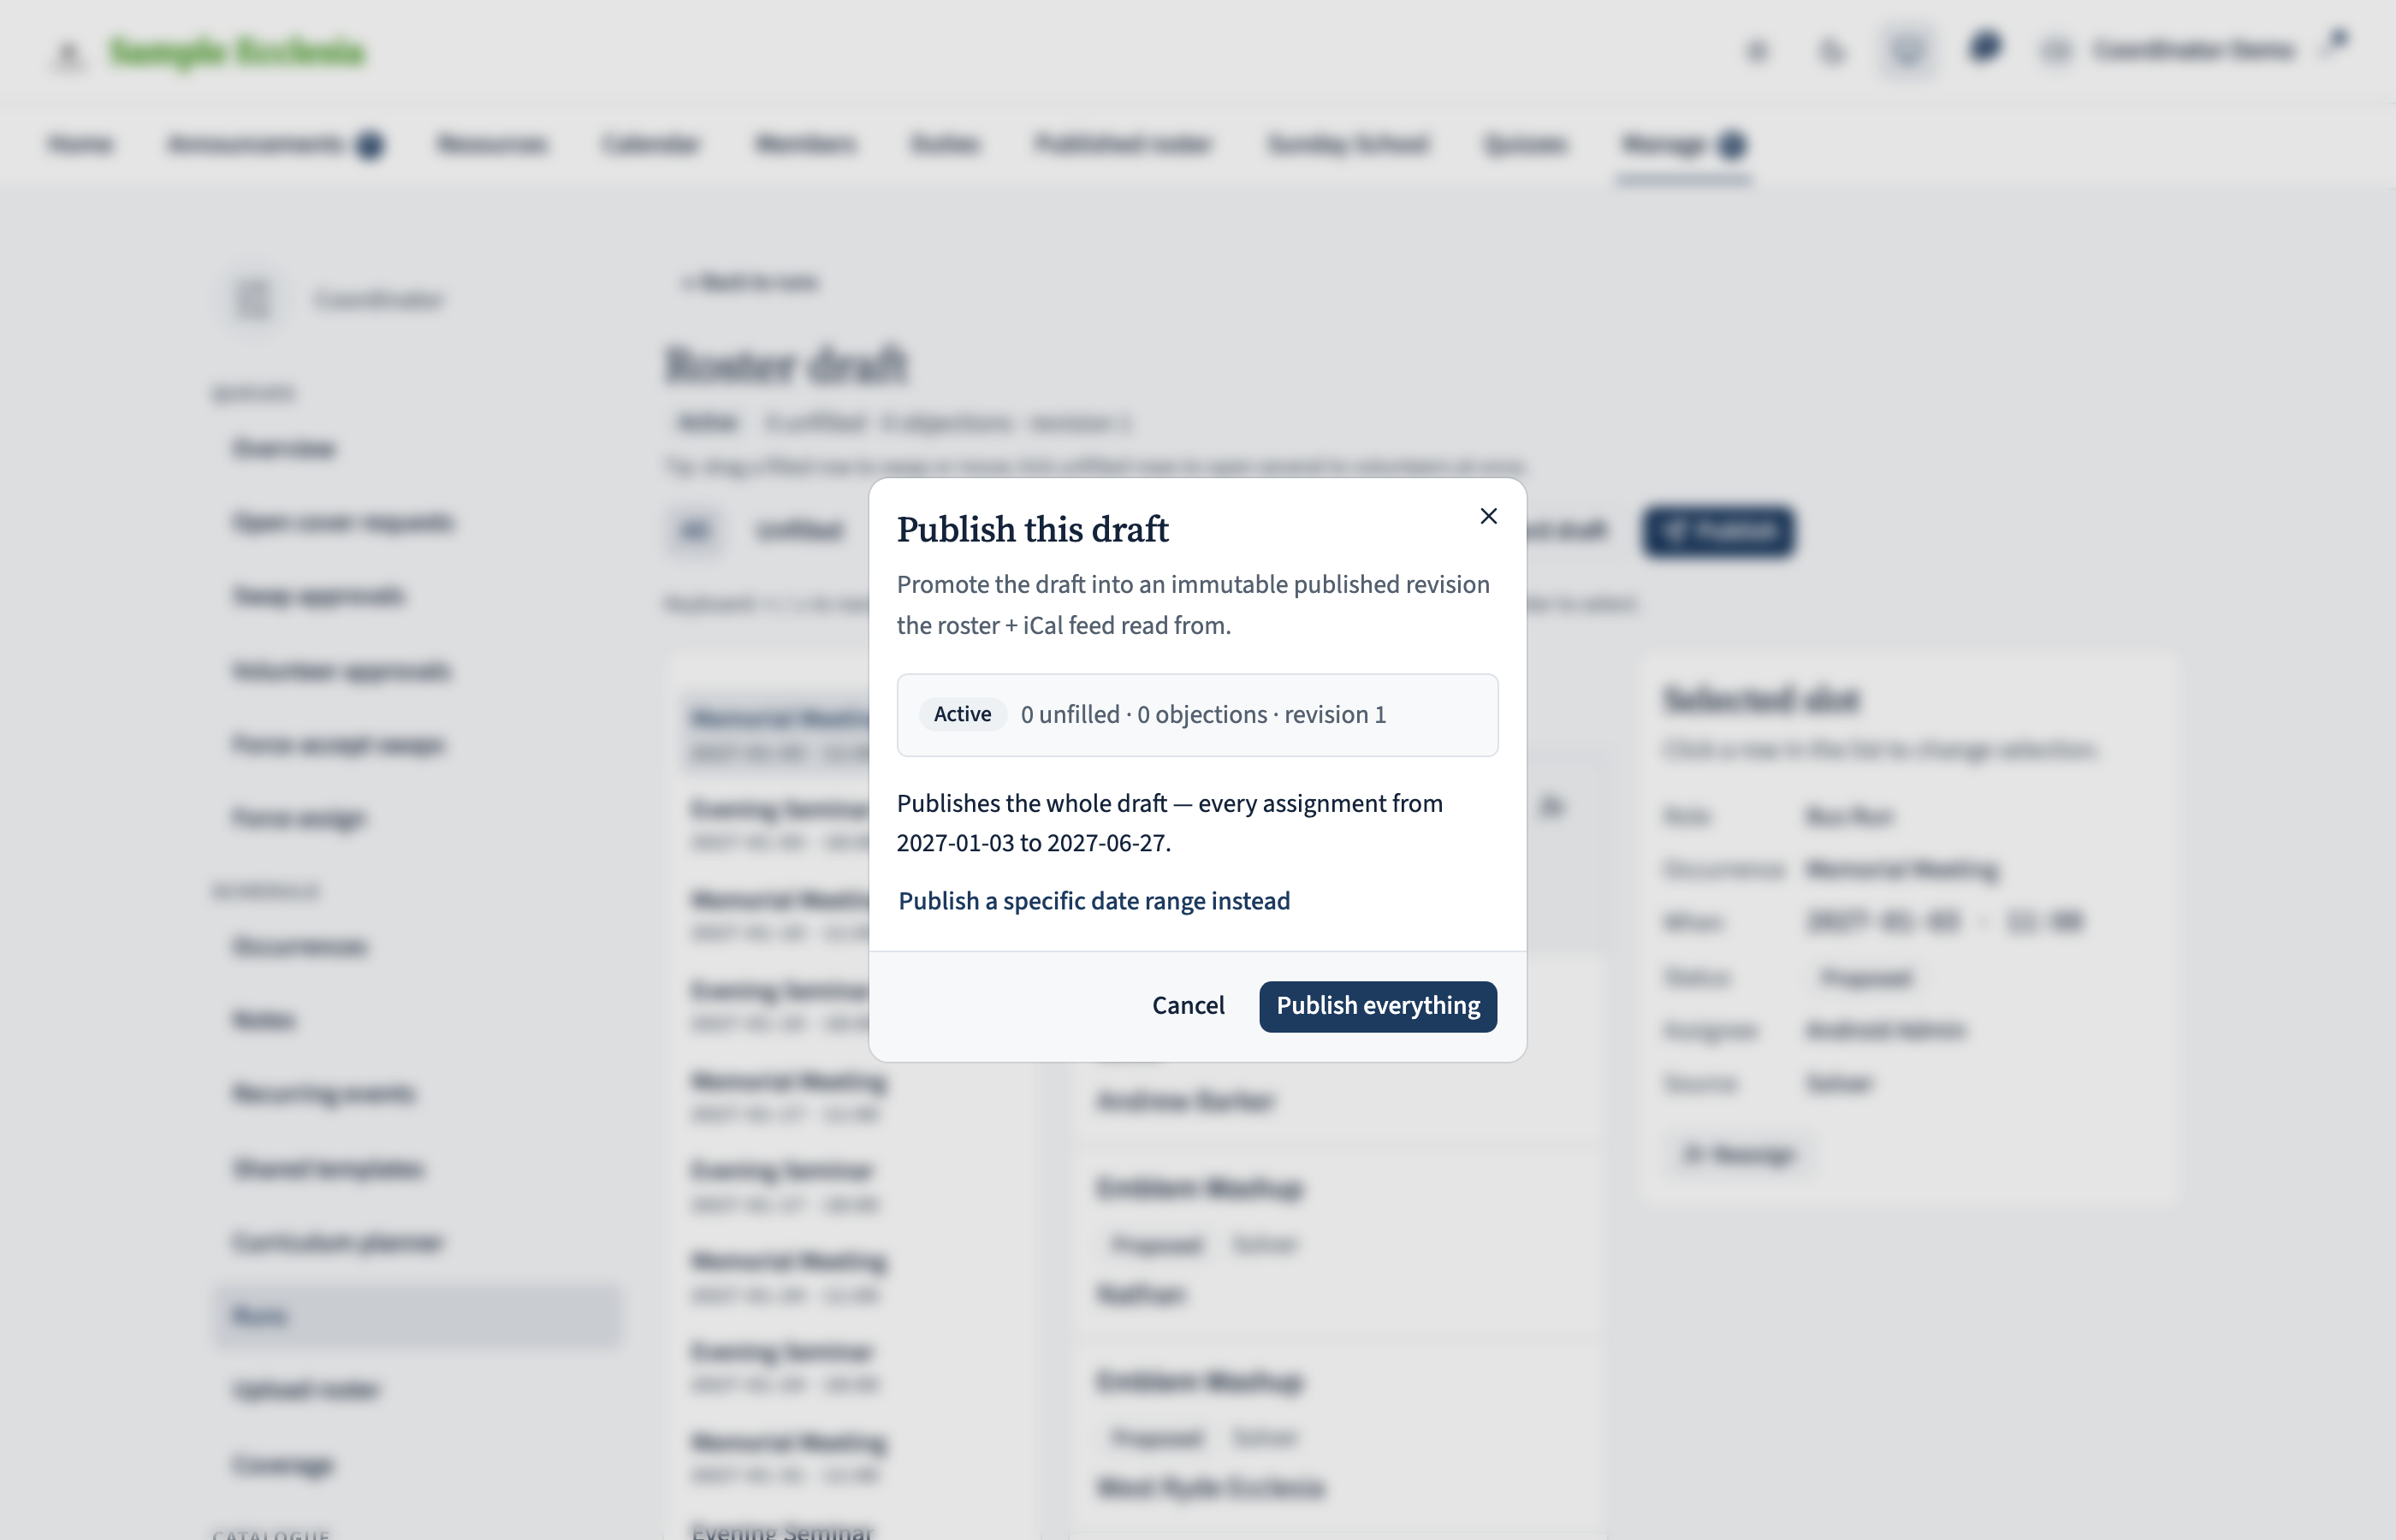
Happy with the draft? Click Publish in the header. The dialog summarises what’s in the roster and asks you to explicitly acknowledge any outstanding objections or unfilled slots. Once published, members see the roster on their home page and receive reminder emails on the schedule the administrator has set up.
A published roster isn’t frozen. For small fixes, coordinators can still adjust individual assignments in place (emergency reassign, override) — every change is audited and triggers reminder recomputation. For a bigger change, use Unpublish— on the roster page (beside the current roster or any older revision) or the revision detail page. It returns the roster to an editable draft you can re-run or delete. Members stop seeing it, but anyone who already received a notification, PDF, or calendar feed won’t be told it changed, so you’ll re-publish and re-notify.
Re-running a period that’s already partly published is safe: the occurrences you’ve published are locked and left exactly as they are, and the new run only fills the rest. The draft tells you how many it left alone. Unpublish a locked occurrence first if you want to re-roster it.
On the iPhone app
View published rosters from the app; the full draft build stays on the web.
Manage → Rostering → Published rosters shows the live roster for the published range, occurrence by occurrence — each role with its assignee (or Unfilled), a per-duty actions menu, an Export menu, and an Unpublish control.
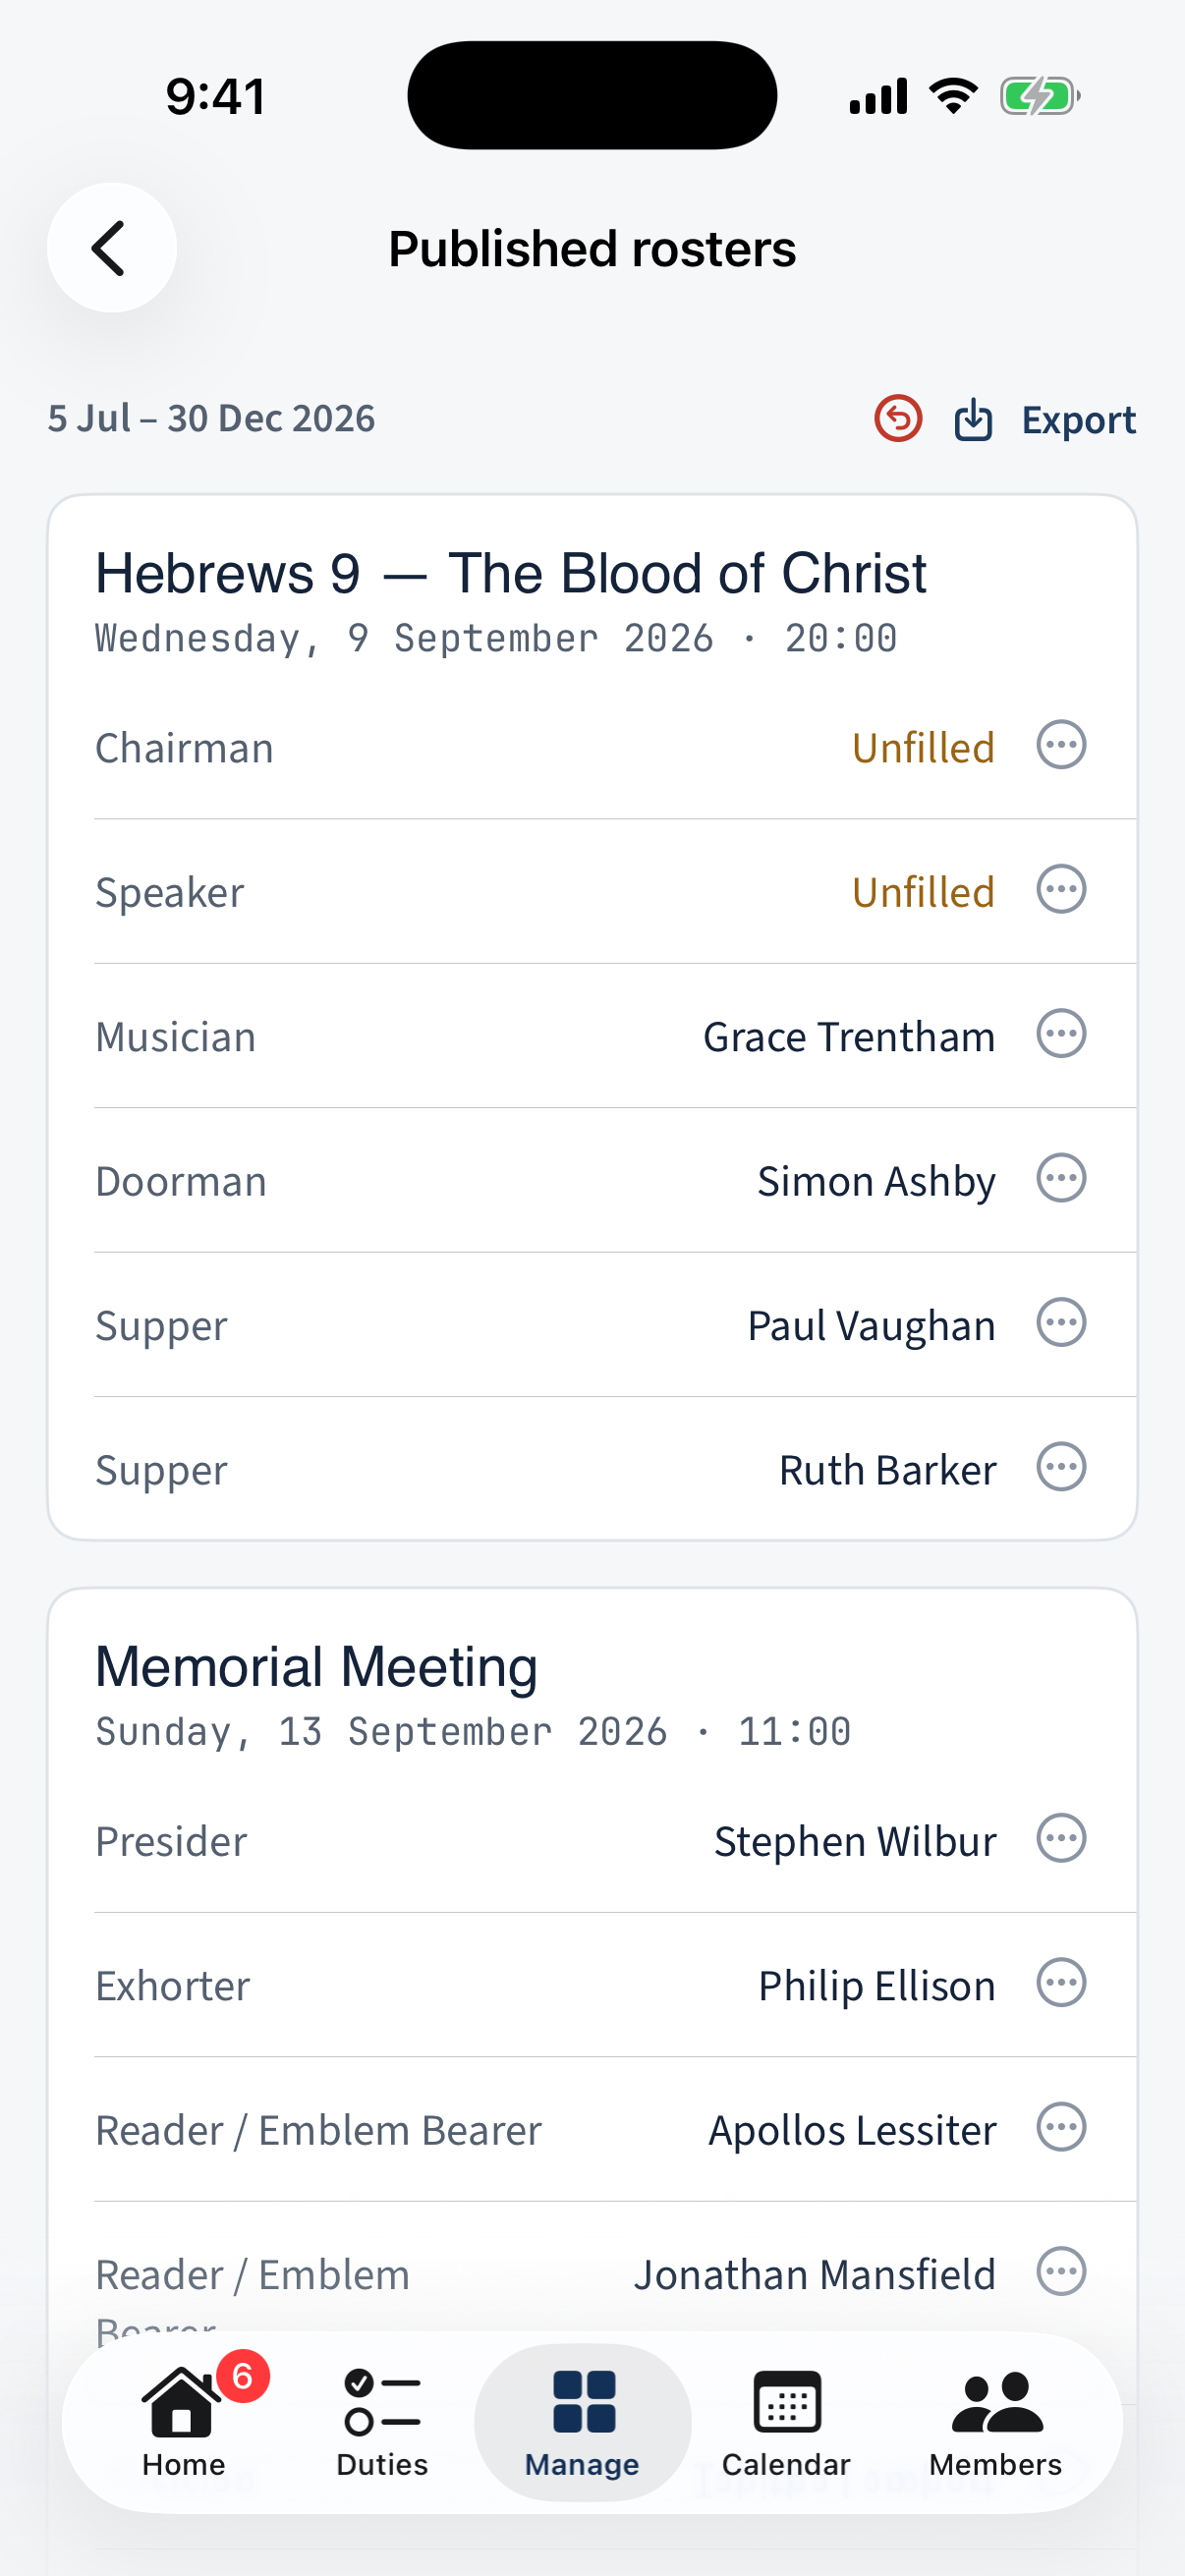
Manage → Rostering → Published rosters: the live roster occurrence by occurrence, each role showing its assignee or Unfilled.
On the web only: Running the solver, reviewing a draft, comparing drafts, and publishing stay on the web.
What next?
- Add a recurring Friday youth event — the administrator’s side (creating templates for the solver to expand).
- Managing your availability — what your members should be doing before you run the next roster.
- Post-publish: use Coverage (under Manage) to spot roles that are chronically under-filled — that’s usually a hint that a role’s eligibility criteria are too tight for your tenant.